Showing posts with label Review. Show all posts

Monday, 12 February 2018

Dewalt DW738 Bandsaw Review

I've had this bandsaw now for nearly 10 years and thought it's about time to review it.
Essentially this is a 13" bandsaw (nominally 12") and has a resaw capacity of 155 mm or 6".
The version I have is a 2 speed saw with the speed changed by moving the drive belt onto different pulleys. When supplied from the factory it is in low speed mode and I didn't move that setting until early on in 2014. Then it was found that it ran much too fast for the type of work I use it for. So I moved it back to the slow speed. It is more trouble than it is worth to change it.
Assembled Dewalt DW738 Bandsaw

There is another saw with a continuously adjustable speed setting and it is designated the DW739. That saw is not reviewed here but probably is similar in specification and operation.

Unlike a lot of good Dewalt equipment it should be a different colour. Like Bosch DIY green against Pro blue. Dewalt DIY stuff needs to be brown instead of corporate professional yellow. It is definitely hobby DIY level but has served me well for the last 10 years.

Tuesday, 23 May 2017

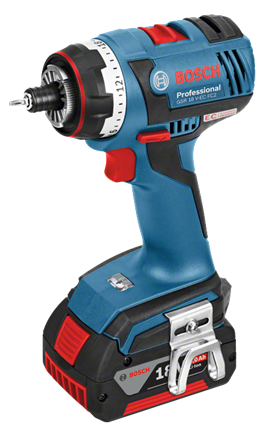
Bosch GSR18V-EC FC2 FlexiClick Drill and 18v 4.0 AH Wireless Battery Review

An essential tool for use in the shop is some sort of drilling device. In the old days a brace or  "egg beater" drill would suffice. Nowadays they have been supplanted by cordless drills. I needed an extra cordless drill for the shop as sometimes you need a few drills setup to do different tasks (drilling, countersinking, screwdriving) so I thought I would have a look at the Bosch range.

I already have several Bosch Blue Professional tools and seem to have bought into the LBoxx systainer storage system. If you are into Festool or Dewalt of course you may have gone down their respective storage routes.

The Bosch Professional 18 volt family is wide ranging, Drywall screwdrivers, impact (percushion) tools, hand held circular saws, jigsaws, impact drivers/wrenches, combination tools and of course handheld drills.

The Bosch GSR18V-EC is part of the Bosch Professional 18V family and has a powerful EC brushless motor. It also has the "FlexiClick" system enabling it to take a range of interchangeable tool holders.
In its basic form it comprises a hex tool holder 


It also comes with a 13mm (1/2") Auto-Lock chuck. No tools are needed for the latter like most drill chucks these days.

The brushless motor gives a long life and low battery drain. The drill was supplied in an L-Boxx 136 with internal moulded dividers.


The drill has the usual controls

  • 2 speed Gear control Low/High
  • Direction rotation clockwise/anti-clockwise (counter-clockwise US)
  • 18 position torque setting
  • Battery charge condition
  • Bright LED illumination

So nothing new there as most drills today have those features.

Other features

  • Tool belt clip. The manual says this can also be used to hang the tool from a ladder - although I haven't yet tried that feature out!
  • Replaceable colour clips for easy labelling and identification of the tool - I don't think I will use that feature as I currently only have one of these!
  • Mountable bit holder for easy transport and storage of bits on the tool - useful I think.
  • Electronic Motor Protection (EMP) protects the motor against overload - a good feature.
  • Bosch Electronic Cell Protection (ECP) which protects the battery against overload, overheating and deep discharge - a great feature. 
  • Kickback control. When drilling large diameter holes wen you emerge on the other side of might hit an embedded nail this will prevent the drill from snatching from your hands and kicking back. I think this is a great safety feature that I've not seen on other cordless drills.
  • Very compact head length (173mm or 6-7/8" long) but still retains high power - it is surprising how short the tool actually can be with immense power reserves.

Battery packs

There is a large range of Lithium Ion batteries are available, wired and wireless so you can choose the best one for your needs.
There wasn't a battery supplied in this kit and there is a wide range to suit all tastes.

I decided to buy the wireless charger and the new 4.0AH CoolPack wireless battery. This is promoted by Bosch as being the "Worlds first wireless charging battery". I think they left out "system on a power tool" on their promotion material. Now I'm not sure of that claim as I've been using a wireless charging (Braun Oral B) toothbrush for years now and some mobile phones can also be charged wirelessly! I think it is a matter of time before all major manufacturers give the option of wireless charging. At the time of this writing this blog (May 2017) neither Festool, Makita, Milwaukee, Portacable nor Dewalt have a wireless charging option. I haven't checked any other brands yet.

The battery also has a bush button "charge left" indicator. This is 3 LEDs that light up according to how much charge is left. This can be seen on the phot above just below the BOSCH logo and lettering.
The battery itself is an induction charged device and simply is placed atop the induction charger GAL 1830 which I also bought. The battery can still be mounted on the tool so simply placing the drill on to the charger works well. The battery slides into place onto the toolwith a satisfying click. I placed the whole drill on charge for about 45 minutes before using it the first time.


Accessories

There are a range of attachments that you can purchase separately.

  • Right angle drill adapter
  • SDS rotary hammer adapter
  • Offset drilling adapter


From the 3 extra accessories I can see the offset drilling adapter to be very useful especially when fitting drawer slides. This adapter enables drilling very close to internal edges and walls. That might be a future purchase for TMc Woodworks.


The right angle adapter enables drilling at 90 degrees to the axis of the drill motor. Again great for drilling/screwing in confined spaces.


I can't really think that the SDS adapter would be any use for me as I already have a corded SDS drill. I suppose if you are up a ladder trying to drill holes in brickwork then it may be ideal for you. It will drill deep holes up to 10mm (3/8") diameter into concrete.


In use


I have had this a short time now and find that it is very comfortable to use, relatively lightweight, has masses of power and torque. It is far better than any of the battery drills I've used or still own. Drilling large holes in wood does not faze this drill. A comparison to my older drills is that the Makita would definitely bog down when drilling larger holes. The Bosch on the other hand just carries on with no changing in motor pitch.

The adjustable torque control is excellent. I've found when drilling through 3/8" holes in wood results in a relatively clean exit hole (without any backing). Of course my drills are all newly sharpened and the torque control was set to 6. When the bit broke through the clutch slipped and I found the bit hadn't gone fully through. Another slight squeeze of the trigger resulted in the bit slowly exiting the hole and very little fibre tearing. Obviously if drilling holes in furniture always have a backing board to ensure a clean exit hole.

The gearing is very smooth and the change from low speed to high speed is via a sliding switch. The drill did need to be stationary when changing gear.

Charging was a revelation. The charger can be remove from its carrier and placed on a bench, inset into a bench, works through thin acrylic or glass (so could be built into bench or charging station, doesn't get warm and is quick charging.
I don't think I'll go back to conventional chargers after trying this one out.

The LED light stays on for a few seconds after letting go of the trigger and is angled to illuminate the drill bit. Nothing different there from most other modern battery drills.

The belt clip would hold onto my belt but I don't think I would make much use of it.

The downside
I also found that fitting the bit holder to handle stopped the drill from sitting properly into the L-Boxx systainer. I removed the bit holder.

Colour coding the back of the drill is possible with the supplied plastic inserts but I found that pointless. If I had about 4 of these drills it might make more sense but I still don't think I would use colour coding.

Changing the chuck for other tools is very easy and quick. The drill body can be used on its own with screwdriver bits. There is a positive locking 1/4" holder built in.

Conclusion

There is nothing unusual in the operation of this drill as it is just that - a drill. However the addition of the optional attachments make it an attractive offering.
The main reason for buying this was to try out the wireless charging battery. It is excellent and make the drill a worthwhile investment. There are currently high capacity versions of the battery available (up to 6Ah) and Bosch is expanding the range of tools that can use the wireless batteries.
If you still have a conventional contact charged battery in a recent Bosch blue tool then you can change over to wireless as they are compatible. Check out the Bosch website to ensure beforehand though.


Thursday, 14 July 2016

Paul Sellers Essential WoodWorking Hand Tools - A review - Part 1 the book

This book by the fantastic English woodworker Paul Sellers or as he calls himself "an amateur woodworker" has been anticipated for a while. There is also an optional 3 disc DVD called "Using & Sharpening Essential Woodworking Hand Tools". I bought both. For those who are unaware Paul started training as a woodworker in 1965. He has also taught many thousands of people through courses both in the USA and the UK. So he has more than 50 years of experience and has reached even more people with instructional videos of woodworking techniques and now broadcasting via the internet. A lot of his videos are freely available on his Youtube channel. Check them out if you are interested.

Sharpening Equipment

The book itself is a hardback tome of 480 pages. The opening chapters cover sharpening equipment, stones, files for sharpening saw teeth, sawsetting the teeth and burnishing for card scrapers. Emphasis is made on keeping the tools as sharp as you can. When they start to become blunted go back to the sharpening station and touch them up ready to go with the minimum of downtime.

Layout Tools

The second group of chapters cover tools for laying out projects. Squares and measuring tapes are covered. The use of a marking knife is emphasized. Paul favours the use of a double bevel knife whereas I myself prefer a single bevel but with a diamond point. Paul likes to use a marking gauge with a point whereas I like the Veritas wheel gauge. But he points out the good and bad points of either. There is also a section of sliding bevel gauges. I now know the limitations of mine as pointed out by Paul's concise argument.

Chisels and Gouges

The third group of chapters covers chisels and gouges. He discusses the various types such as firmer, bevel edge, mortise and butt chisels. He concludes that the most useful are bevel edged chisels with firmer and butt coming lease useful. He goes on to discuss sharpening techniques for chisels. Then he moves onto gouges. Who knew that there was a numbering system for gouges? I certainly didn't. He also goes to show how he keeps gouges sharp and in optimum condition.

Planes

The fourth group of chapters covers planes. This is a very interesting section of the book and he poses a few questions:

  • Should you have one of every number of bench plane?
  • Do you need a jointer plane for levelling?

His answer was surprising to me. Essentially if you buy your wood pre-milled or use power tools to mill your stock (I do the latter) then the answer is no. Most of Paul's work is done with a #4 smoother including rapid stock removal and jointing. He seems to use mainly old Stanley planes that he's owned since he was knee high to a grass hopper or has refurbished. That sounds like a similar way to how most woodworkers have obtained their planes.
Spokeshaves
He also covers spokeshaves his own favourite is a Stanley 151 bevel down. He finds that particular plane is good for difficult grain.
Plough Planes
Then he has a section on the plough plane preferring the Record 043/044 models. There is also a discussion of older wooden planes and shows how smooth they are.
Router Planes
There is a chapter on the router plane and this concludes with how to make a "Hags Tooth" or poor mans router plane. Basically knocking a chisel through a block of wood. There is also a video on his Youtube channel showing how to do this.

Saws

The next three chapters cover saw sharpening, handsaws, backsaws and the coping saw.
He shows how to use the 3 square file to sharpen the teeth on saws. How to use a sawset and support the saw in a saw vice. There is a section on possible errors you may come across while using a saw, how to identify and correct the issue.
There is an extensive section on the types of saws you may encounter and how to hold a saw. You may have thought that there is only one way but Paul shows you the best way in his opinion.
This section concludes with that much underestimated saw the coping saw.

Abrading Tools

This section of two chapters covers scrapers, rasps and files. The scrapers cover the card scraper and cabinet scraper. There are recommendations on what hand stitched rasps a beginner should just. Not the brand but the lengths and grain (roughness) that is best suited for a new user.
Paul also makes use of engineering (metalwork) files in woodworking as it produces a fine finish after using a rasp.

Boring tools.

Drills and boring tools follow in three chapters dedicated to Brace and Bit, Hand Drill and Square Awl. I have a brad awl for starting holes but never thought to get one of these bird cage awls that can be used to start a hole or bore one right the way through stock. My brace drills are currently up on the wall of the shop collecting dust. I shall have to dig them out.

Striking tools.

Hammers and mallets come next. Paul likes the Thor nylon headed mallet and uses it for chiselling and the other side for tapping joints together. There is also a discussion on the steel hammer that everybody is familiar with.
The last chapter covers large wooden mallets. Particular attention is given on how to construct your own mallet, wood selection, drying the wood if necessary and making a mallet to last a lifetime. This is a good exercise for a youngster or a beginning woodworker.

Care

The last section show how to maintain and care for your hand tools followed by a glossary.

Conclusion
The book is illustrated with excellent colour photographs throughout. There are also clear drawings by Paul. The book is highly detailed and conveys Paul's opinions based on his long experience in all things wood. As they are his opinion others might not agree with some of the text but it is very well worthwhile considering. The book is very definitely an excellent resource that is worthwhile reading. It is useful for beginners through to long in the tooth woodworker and is a great addition to any woodworking library. This is not a cheap book but is available from various sellers worldwide.
Go to PaulSellers.com for a link to where to buy this.

Currently on sale in UK via Amazon at £38 GBP including shipping.
in the US it is on sale at Highland Woodworking at $55 US + shipping


Friday, 17 June 2016

Bosch GKT 55 GCE Track Saw - Review

In the past you had to rely upon expensive panel saws, CNC equipment or table saws to make straight splinter free cuts. When Festool created their first track saw more than a decade ago they set the benchmark. You no longer have to struggle with 8 x 4 sheets of material getting them onto the table saw. I've been looking for a track saw for a while to prevent injuring my back and the toss up was indeed the Festool range, the Dewalt, the Makita or the Bosch. It had to be in the professional spec as I want it to last.

I had a look at the first three and the Festool TS55 was very impressive. However when I compared it to the Bosch GKT 55 GCE I felt the Bosch had the edge on the original.

So I took the plunge, so to speak, and raided the piggy bank to buy the Bosch.

What's In The Box?

The particular deal I went for was for the saw, an L-Boxx storage case, two plate tracks, joining plate, track clamps and plate carrying case.
The delivery came in two packages, a large cardboard box containing the Saw and accessories, the other a long thin package containing the tracks in their carrying case.

Thursday, 8 October 2015

Trend T4 Review - not good

I am a fan of Trend products as all of their professional products, routers, safety equipment, cutters etc that I own are top quality and built to last. However the T4 router is garbage here's why:

I needed a small plunge router and the Trend T4 seemed to fit the bill and at the current Amazon price point also seemed to be a bargain. I ordered one. The router itself is a 850 watt 1.1 HP machine with a plunge base which has a 30mm (1" 1/4) plunge. It comes with a pressed steel adjustable fence, a few tools, 3 sizes of collet (1/4", 6mm and 8mm), a transparent plastic dust shroud, instruction manual all enclosed in a blow moulded carrying case.

The dreaded T4

The router has an electronic variable speed control mounted on the top of the motor which goes from 11500 to 32000 rpm. The highest speeds are intended to be used for die grinding as the plunge base comes off the motor making it a hand held die grinder. For routing the manual recommends setting the variable speed control to 4 which is around 24000 rpm. The plunge mechanism itself it very smooth with external springs over the plunge shafts. There is a 3 position turret stop and a continuously variable plunge stop. The on off switch is conventiently located on the front of the router and is easily latched and unlatched. The plunge lock lever is on the rear and is in the roght position for an index finger to control.

The router and its cast aluminium plunge base are all well made and look as though they will hold up to light use. The router itself is marketed as hobby/DIY/light trade usage and as I just wanted it for occasional use it would probably suffice. I intended to dedicate it to pattern copying using guide bushes and removable collars to route cavities the exact size of cover plates. My Trend T11 is great at this but is too heavy - hence the need for a lighter smaller router.

All seems good so far.

Guide bush and collar

Trend T11 - I love this machine
First of all some explanation of guide bushes and the Trend T10/T11. I have an extensive set of guide bushes/collars - they are all standard across Trend routers - and decided to fit one to see how concentric the motor shaft is to the base. On the T10/T11 there is a sub plate that is fitted first of all and a centralization shaft (line up pin in Trend speak) is fitted into the collet. A 30mm guide bush is fitted to the subplate (innerplate in Trend speak) and the whole assembly is manoeuvred on the plunge base to get it exactly central on the shaft. Screws lock it into position. The guide bushes are fixed to this plate with countersunk screws so if you put one of a different diameter in place it will always be concentric.

Guide bush installation instructions for a T10/T11 router
And now the T4. The T4 has no provision for an adjustable subplate and the guide bushes are intended to fit into a machined recess in the plunge base. There is no adjustment at all! The router also does not come with a setting centralization shaft either. It came as no surprise that the guide bush was not concentric to the motor shaft. It was out of alignment by a considerable amount (around 1/16"). There was absolutely no way of adjusting this and for the intended purpose I had for the router it was impossible to use.
It does not come up to the high standard of the rest of Trend's products and I can't understand why they would have let this on the market with such a fundamental design flaw. It couldn't be used as I intended nor could be used in a dovetailing jig. It could however be used quite successfully for bearing guided pattern routing, edge guided routing, die grinding and normal routing duties very well.

So I have started the process of sending the router back as "not fit for purpose" without even making any dust.

I think if it wasn't for this major manufacturing/design problem the router itself would be OK.

Thursday, 21 May 2015

Oneida Dust Deputy Deluxe - Review

I was pleased to see that Rutlands had become the official UK distributor for the Oneida Dust Deputy. This is a cyclone that you can retrofit to any shop vacuum. It must be stressed that this is for a shop vac and not a larger 4" or greater dust or chip extractor. The latter normally run at a lower vacuum but higher flow rate than a shop vac. They are designed to extract large volumes of chips.
A shop vac on the other hand is designed for lower flow rates but higher vacuums and is ideal for smaller particles such as fine dust.
The problem I have found over the years is that a shop vac filter clogs decreasing the efficiency of the unit to such an extent that sometimes it becomes useless. You then have to strip the unit down and clean the filter. It then works better for a short time until inevitably becoming clogged again so you have to repeat the process.

The Oneida Dust Deputy is designed to be used in line between the dust producer and the vacuum. The cyclone essentially swirls the dust and chips around and they drop into a pail underneath the cyclone and never actually reach the vacuum filter. Oneida claim that 99% of the material ends up in the pail with 1% only reaching the vacuum itself.

So reading between the lines the benefit is "most" of the vacuum is available all of the time and no need to constantly clean the filters.

I ordered mine on the Sunday online and it arrived on the Tuesday morning. In the evening I went into the shop to fit it to my aging MacAlister wet and dry 30 litre vacuum cleaner.

What's in the box?

Thursday, 19 February 2015

A Teak Wooden Bodied Smoothing Plane - Part 2

I've just got around to finishing off the plane.
A blade lever cap plate was made, again from some teak, about 3/8" thick x 1-5/8" wide x 3-1/2" long. A 30 degree bevel was cut on the leading edge and the back end rounded off. A 3/8" hole counterbored to 5/8" was drilled at the far end. A brass shouldered and threaded insert was pushed into place. The brass adjustment screw was inserted.

The lever cap needed slight adjustment on the top face to slide under the cross pin with ease.
Then it was coated with some lacquer.
After a couple of coats of shellac I applied another few coats of a waterborne gloss lacquer from ToneTech simple with a foam brush. When the lacquer had cured I set about clearing the slot of any remaining lacquer.

Then the sole of the plane was trued using some self adhesive sandpaper on a convenient cast iron surface (my table saw). The teak really does suit being used as a wooden plane and it was very easy to obtain a true surface.

The first thing to insert was the 1/4" diameter brass cross pin. This is a push fit into both holes and went in with some tapping from a deadblow mallet.

Next to be fitted was the bearing cup. This is dropped into the mortise made by the 7/8" Forstner bit and fits perfectly. I did have to remove some of the lacquer again and just had to square up the bottom of the mortice slightly as it was out by a couple of thou. This made the cup parallel and co-planer with the bed.
The bearing cup was secured with the supplied brass screw.

Thursday, 24 April 2014

Sketchup 14 tiny review

I'm been a user of Sketchup for years and I've been testing the Pro version of Sketchup 14 for the 8 hour evaluation period and have found it very good. The additional features of Sketchup Layout are fantastic if you are a professional user and have to get working drawings out to clients. I'm not a professional engineer anymore, having left that profession using AutoCad many years ago, so don't need the feature.

New to this version is a template especially for woodworkers either in inches or millimetres. This was previously called Product Design Woodworking in V13 but has now become a template in its own right. They have also made vast improvements to the Extension Warehouse. One extension I always install is called Layer Manager by D.Bur. This is a superb tool if you are familiar with the concept of layers.

The 3D modelling extras in the Pro version are useful but not essential in a woodworking design environment. For instance if you want to project a radius all the way around a surface (producing a representation of  a roundover like the lid on this box)

you can do it quite easily using Intersect Faces command. You then have to erase all the extraneous lines produced manually. The Solid Tools command does all of this for you but it costs $$$ (or £££ if you are English like me) for the privilege. I, as a weekend warrior garage woodworker, am happy to do this by hand so it's no big deal.


Tuesday, 5 November 2013

Record Power AC400 air filter review

I've had this unit for just over 12 months now and thought I would share my thoughts about it with the woodworking community.
The unit came is a large well protected box and was complete with all accessories.
The main unit
A remote control
Batteries
Rubber Feet
Hooks and chains

The specification of the unit is:
  • Outer Filter: 5 Microns
  • Inner Filter: 1 Micron
  • Overall Dimensions: L514 x W431 x H258 mm
  • Sound Rating @ 1 m: High Speed 69 dB
  • Medium Speed 67 dB
  • Low Speed 62 dB
  • Air Flow: High Speed 409 CFM
  • Medium Speed 362 CFM
  • Low Speed 260 CFM
  • Motor: 120W, 230V, 50Hz, 1 Ph
  • Timer Settings: 1, 2 and 4 hours
  • Weight: 14 kg
                      As I live in the UK it is set to run at 230 V ac. In practice the unit is suitable for shops of up to 113 m3 in size. My shop is around 90 m3 so one unit is more than adequate.
                      Essentially the AC400 comprises a steel box with pierced removable covers on either end. The motor is directly attached to the impeller to make up an efficient centrifugal fan. These type of fans are extremely quiet in operation.


                      Siting

                      Record Power state that the unit is to be mounted at least 2.13M above floor level. I have mine mounted in between the roof trusses in my shop about 2.3 metres above floor level. There is a lifting handle should you want to carry it up a ladder. Rubber feet are provided should you wish to situate it on a high shelf.
                      AC400 in position in my shop as
                      seen from below


                      Sketchup view of where the AC400
                      is located in my shop

                      The unit is located above the table saw and hand-tool area in my shop. I have it positioned with the outlet 2/5ths away from the wall on the shorter axis of the shop. My shop is around 5 m x 6.5m so it is essentially about 2m away from the wall. This asymmetric positioning apparently creates a natural air circulation.

                      Controls

                      The unit is plugged into a mains electricity socket which is switched permanently on. You can control the unit in two ways:
                      1. Climb up a ladder and operate the controls on the unit
                      2. Use the supplied remote control.

                      The remote control appears to be an infrared sender unit as you have to point it at the AC400 at the outlet side. There must be an optical receiver on the outlet side somewhere. I must confess I cannot see it but my eyes are not as good as they used to be - my excuse and I'm sticking to it.

                      Operation

                      Controls on the remote are very concise, clear and easy to use.
                      Pressing the green button switches the AC400 motor on in low speed mode. Pressing the green button again changes to medium speed, once more into high speed. If you press again you go back to low speed and so on. The LEDs on the AC400 register the speed you are currently running at and are very useful.
                      The yellow button engages a timer function starting with 1 hour, press again for  2 hours and press again for 4 hours.
                      This is incredibly useful as it automatically switches off so you can leave the shop while it is still running knowing that it will eventually shut itself off.

                      Noise

                      What noise?? Seriously in operation the AC400 is really quiet. You barely know it is on. There is no hum just a gentle blowing. At high speed its noise rating at 1m away is 69db which is normal conversation level.
                      As the thing is up in the air you are not disturbed by it especially in a workshop which has much louder noises around.

                      Performance

                      Before I got the unit there always seemed to be a "fog" in the air which lasted quite sometime after the last machining operation. Now it is dispersed very quickly and the shop appears to stay clean after I have swept it. Sure there are still odd bits of dust on flat surfaces but it is much better now.

                      Filter cleaning/replacement

                      The filter cartridges are really easy to remove from the AC400 and it can be left in situ. There is a simply steel spring clip holding the outer filters in place. Once extracted these can be vacuumed with the shop vac or replaced. The inner 1 micron filter lasts a bit longer and also can be vacuumed.
                      The cost of replacement filters is not very high. I think dependant upon usage you may be able to clean them 2 or 3 times a year and then replace the 5 micron filters. The internal ones should last much longer before replacement. 

                      Five Year Warranty

                      Record Power stamp this on all their products to stand by the quality of their products. They will support any manufacturing faults that arise in that very long guarantee period. Not many companies offer this sort of warranty these days and Record Power need applauding.

                      Faults

                      I have had one fault with my AC400 and it happened 12 months into ownership. I don't use it 24/7 just when I'm in the shop doing machining operations. A couple of weeks back I had used it one night and then the next day it wouldn't start. I checked the batteries in the remote and also tried to operate it with the manual controls. This proved fruitless.
                      There is a 1 amp 1-3/8" long fuse on the control panel. I removed it and found that it hadn't blown but tested it just in case. All was OK. 
                      So I went onto Record Power's website and as I had previously registered all of my RP equipment serial numbers there I raised an incident.
                      Within 24 hours I had a response and they said they had identified a fault with the PCB controller due to faulty components on other similar units. A new PCB was despatched to me and I received it next day.

                      Disassembling the AC400 is relatively straight forward only requiring a #2 PZ screwdriver. I was easily able to replace the old circuit board with the new one and had it working within about 10 minutes of the postman handing it to me. All in all top marks of 5 stars to Record Power support department.

                      If you are not too certain of how to replace it yourself RP also offered to get one of their engineers to do it for you. All you had to do is take it to your nearest RP supplier.
                      Burnt out AC400 PCB
                      It looks nasty but was easy to replace

                      Conclusion

                      Record Power have made a superb, relatively affordable, air cleaner for use in a woodshop. I can heartily recommend this for weekend warrior usage or indeed semi-pros too. With the inclusion of an excellent 5 year warranty combined with superb customer service you can't go wrong with this unit.

                      Saturday, 21 September 2013

                      Bessey Uni-Clamp Review

                      Recently I saw the Bessey Uni-Clamps on sale for a reasonable price so bought a set of 4.


                      I have to say these are great for small glue ups as they follow the now standard parallel clamping format and are classed as light duty. The version I bought is the UK 300/80 which in USA/Canada are the 12" x 3 1/8".

                      Friday, 24 May 2013

                      Dewalt DT7612 Quick Change - Drill & Drive Accessory System Review

                      This accessory is offered by Dewalt to enable the user to drill  and counter sink holes and then tighten up screws without having to use a different drill or screwdriver attachment.
                      Blow moulded box

                      I had about 400 pozidrive #2 head screws to put into a project I was building and didn't relish the task. Either I had to buy another drill or get a quick change head. I opted for the latter.

                      The device comprises:

                      • A main drive holder with a hex drive shank that fits into the drill chuck. It has a socket which takes the drill/driver holder
                      • A drill/driver holder
                      • 3 drills giving tapping size for #1 to #3 pozidrive/philips drive
                      • 3 countersink bits with clearance hole for the drills
                      • 5 drivers (3 #2 pozidrive, 2 #2 philips drive)
                      • 1 all key/wrench
                      • 1 blow molded box

                      Contents

                      In use you put the main drive holder into the drill and secure.
                      Drill/Driver holder and main drive body
                      Next you chose the tapping drill you wish to use and insert it into the drill/driver holder. The countersink is positioned at the depth you want to drill to and secured with 2 socket head grub screws.
                      Next lock off the two grub screws securing the drill into the body of the drill/driver holder.
                      All that remains is to insert the driver into the other end of the magnetised holder and secure with a single grub screw.

                      Then it is a simple matter of inserting the drill/driver holder into the main drive body. It locks into place with a spring loaded latch.
                      Insert the drill/driver
                      Drill the hole and countersink in the piece of wood and then push the locking collar forward. This releases the drill/driver holder. Take it out and invert it. Put it back into the drive body and you are ready to tighten up the screw.

                      Assembly with the drill in place
                      Inserting the drill/driver in driver configuration
                      When I had finished drilling 400 holes and inserting the screws I was really impressed how quick it was to do it. The drill still had a keen edge and the driver didn't look as though it had been used.
                      You soon develop a skill of holding the electric drill and changing the bit with one hand.


                      Assembly set ready to drive.
                      Overall I can recommend this as a useful addition to the shop or for site working for the professional. This is a superb accessory for any drill.


                      Friday, 25 January 2013

                      Axminster AW106PT2 Planer/Thicknesser (Jointer/Planer) Combo review

                      I decided when I designed the new shop that I could no longer put up with a deafening bench-top jointer and made a space in my machinery nook for a bigger trade rated jointer. In the UK and Australia a jointer is known as a planer. Just to add confusion to this a planer is known as a thicknesser!!!
                      Have a look at the wikipedia articles for the jointer here and the planer here.

                      So for the purposes of this review I shall refer to the machine as a planer/thicknesser.

                      WARNING! THIS IS A LONG REVIEW so click the read more button.

                      Arrival

                      The machine arrived early January and is one of the last of the "White" series of AW106PT2 machines and I got it considerably cheaper than the "newer" Trade Series. In fact the only difference I can see is a different label on the outside and the specifications say the cutter head spins slightly faster.

                      You don't really want to see a picture of a packing case
                      DO YOU??? Well here it is!
                      The machine arrived on the back of the Axminster truck and the driver, known as "Farmer" (as that is what he used to do before becoming a delivery driver) from Somerset, used his pump fork truck to wheel it off the truck and straight into my shop. It was in a large packing case made from particle board and was securely nailed together. I extricated it from the case and found everything inside was safe and secure. There were no parts missing and it was 95% built.
                      The fence is still wrapped in plastic here

                      The inner workings

                      Now mobile but fence not fitted yet

                      I had to clean a light layer of oil from the cast iron faces and built it using the comprehensive instructions.

                      Then I built a mobile base and, using the principles of the ancient Egyptians, moved the heavy cast iron structure from its pallet onto some temporary wooden blocks.

                      I positioned the mobile base and gently moved the machine onto it then removed the blocks. The machine then became fully mobile.

                      Friday, 30 November 2012

                      Dakota DK2040 Extendable Universal Mobile Base review

                      The new shop deserves to be cleaned often.
                      There I've said it.
                      To facilitate this I need a system of moving the heavy duty machinery out of the way and what better way of doing this than using a mobile base.
                      I decided a good purchase for my table saw would be a mobile base but which one? There are so many on the market and my table saw weighs around 150 kg. It came with its own mobile base but it wasn't very well made and needed repairing due to faulty, inferior welds. Either I could have taken into a welding shop, blacksmith or hired some welding equipment and welded it myself.
                      Either way it would have cost me money so when I saw Rutlands advertising mobile bases for less than £40 I decided to have a look.
                      I ordered one on their Dakota DK2040 mobile bases on a special offer days when delivery is free and you get 10% off.


                      The box duly arrived 2 days later and it was heavy. I opened it to find every component individually wrapped in bubble wrap plastic. After removing the plastic wrap there were all manner of heavy steel components painted with a substantial layer of black paint.
                      All the nuts and bolts have 8.8 on the heads which means they are high tensile steel. The nuts are collared and serrated on the underside so no need for any lock washers.
                      The axles are all high tensile steel allen cap head screws as are the pivot mechanism pins. Everything shows as being able to withstand the 500 pound (226 kg) loads that it is rated for.

                      I started assembly using the exploded parts drawing. You do have to loosely assemble the parts first to get some idea of the size you want to fit. All the main members have a series of holes drilled on uniform centres of around 1 inch (25mm). Basically you just telescope the inner member inside the outer member and lock them together with the 6mm high tensile bolts.
                      The static wheels are inserted and the axle bolt doubles as a fastener along with the nyloc locking nut. There are many nuts and bolts in the kit and you can put in more than are necessary if you desire.
                      The front wheels are rotating axis castors and they are mounted onto a hinge plate. The hinge plate is actuated by a foot pedal at either side.
                      When the base is in the down position the front wheels are off the ground with the weight being taken by two   adjustable rubber feet. These can be locked at the desired height using an M12 nut.
                      The solid back wheels are always in contact with the floor.

                      In use I mounted my table saw into the mobile base and it moves around on my concrete shop floor with great ease. When in the down position there is no rock or sideways movement. A vastly superior product to the manufacturers own version that came as an extra with the table saw.

                      It was so good I bought 2 more mobile bases, one for the band saw and one for the router table. What's more they have a 10 year warranty on them. A bargain.
                      When I buy my new jointer I will get one of these bases too for that. In fact my oscillating spindle sander could do with one too!

                      Tuesday, 27 November 2012

                      Gorilla Gripper review

                      As part of the new shop build I will be using a lot of OSB (Oriented Strand Board) and plywood to build some partitions and line the inside of the doors. Also I will be using lots of sheet goods throughout the next few years to make jigs, use in projects etc. My back is not what it was and now I'm having problems with hip joints (plural) I thought I could do with a little help in the lifting department.

                      I stumbled across the Gorilla Gripper by Roughneck. I read a few reviews and saw a few videos on it so decided to part with some hard earned cash and ordered one from Amazon.
                      It came today in a plain cardboard box. Unpacking it revealed a well made, industrial rated but lightweight contractors model (32-610) that has a holding capacity of 10 to 28mm (3/8" to 1.1/8")


                      It is made from aircraft grade aluminium with high tensile steel fasteners.

                      The instructions tell you that it is designed to lift and carry large sheets of material from the top without bending or lifting, using the back, wrists and fingers. Of course we all know, or should know, that lifting with the legs and a straight back is a safer and faster way to move heavy materials. You can also use it to grip the top edge of large bags of animal feed, sand, top soil etc.

                      All you have to do is place the gripper securely on the top edge of the material and in the centre of the board so it has proper grip and balance. There are two rubber pads, one on each jaw, that you just have to make sure it has full contact with the material before you lift it. Then you lift it by the handle and the jaws, or gripping plates, tighten on the sheet by the mechanism. You basically carry it at the side of you and a 8 x 4 x 3/4" board is easily moved around. I tried it with a piece I had and even with my dodgy hips (and walking cane) was able to move the sheet around without any problems whatsoever. I am really impressed.

                      It can lift more than one sheet, dependent upon your strength of course, as long as the thickness of the material comes within it's range. I wouldn't fancy trying to lug 2 sheets of 8' x 4' x 3/4" thick MDF around with it for instance. But if you want to you could with the one for doors.

                      They make them in 3 sizes, this one is the middle of the range the others are 0-19mm (0 to 3/4") and one especially for doors 32-50mm (1.1/4" to 2")

                      Olympia-Tools (UK) Ltd are distributing them in the UK but I got mine from Amazon for £47.47 with Amazon Prime. I think the list price in the UK is around £80 so I got mine 41% cheaper.

                      Here's a cheesy 4 minute promo video