Showing posts with label Guitar. Show all posts

Friday, 30 April 2021

The CloudScope 6 string electric guitar

 During all the various lockdowns we been having in the UK (finally coming out of the third one) my woodworking was seriously curtailed. I had some scrap sapele boards left over from a previous project and had a roughed out neck I made a few years ago from meranti and rock maple stress relieving in the rafters of the shop.


So I set to work making another guitar and finished it off last weekend April 25th 2021. This is a hybrid digital and analog guitar meaning it has conventional pickups and a pickup for a guitar synthesizer. I inlaid the ebony fingerboard with mother of pearl clouds and there is a telescope above the clouds in position 1. One of my other hobbies is astrophotography and the guitar has been made in homage to that hobby. We haven't decided on a name for this instrument yet but it will probably have scope, telescope, clouds, stars or something like that in the name. When we (my wife and I) have decided what to call it I will use my pyrography tools to burn its name into the truss rod cover plate. 


The body is made from sapele and I book matched veneered the flat top with some Macassar ebony I have in stock. This is beautiful wood and I bound the edges with mother of toilet (aka plastic) binding. This veneer was also on the headstock. The neck is bolted on as I personally don't like set (glued in) necks as they are difficult to repair if something goes awry.


I have used some dye stain on the top which is yellow. Then the edges of the top have been coated with a dark blue dye stain. This has turned out quite black and is ok. I used the Bob Ross technique of wet on wet to do this purely with a shop rag. It works ok.  


This time I decided to finish it in ArmRSeal but actually ended up with SealRCell on top instead as that was a bit glossier. The amber of the ARS has given the yellow a nice deep colour. I was surprised how a polyurethane finish intended for furniture feels on an instrument as I normally use nitrocellulose or a specifically formulated waterbourne finish. SealRCell feels great and I would have used it before but unfortunately we can't get it anymore do to the volatiles and I'm down to my last couple of cans. I beleive it is not available in some US states now either. It is a shame as the GF wipe on finishes are superb. I won't show all the boring construction details as you have seen my methods before and no doubt they are still on the forum somewhere.


Here it is on the bench in the shop.


The large cover plate is made from 1/8" birch plywood which I faced on both sides with sapele veneer. The round cover plate is solid sapele.

The control cavities within are lined with copper foil for grounding purposes as are the cover plates.


Here you can see the bolt on neck made from meranti and maple. The tuning machines are locking ones and the truss rod is adjusted from the headstock end.


The technical details:


  • Scale length: 25" strung with D'Addario XL NIckel wound 0.046" to 0.010" strings
  • Analog pickups: Seymour Duncan Pearly Gates (as used by ZZTops Billy Gibbons on his Gibson Les Paul "Pearly Gates" guitar)
  • Synthesizer Pickup: Internally wired Roland GK3 divided hexaphonic pickup
  • Bridge: Schaller Hannes
  • Nut: Handcut bone
  • Controls: 2 volume (they go up to 11!), 2 tone, 1 Volume/multi use control for synthesizer, up/down and other selectors for synthesizer, 6 way (yes that's right a 6 position switch) Freeway 3x3 switch for analog pickups.
  • Body lumber: Sapele with Macassar Ebony veneer bound with "mother of toilet" binding
  • Neck lumber:  Meranti/maple laminate with integral bi-action truss rod. 
  • Fingerboard: Ebony with custom mother of pearl inlays clouds/telescope.
  • Frets: Sintoms nickel silver frets 2.4mm wide
  • Tuning Machines: Schaller M6 locking machines
  • Strap buttons: Schaller Straploks
  • All hardware is chrome plated or stainless steel.
  • LED power indicator
  • 1/4" jack plug conventional output - for those times when you just want to plug into a normal guitar valve amplifier
  • 13 pin digital synthesizer feed output - this feeds to an external Roland Guitar Synthesizer 

The neck pickup has the sound of Billy Gibbons - a shame that he is not playing it.

Monday, 12 January 2015

MusicMaking Gear

Here's a few musical instruments, amplifiers, effects and recording gear at Casa TMc
Dunluce Rapter Synth guitar, Tanglewood acoustic, TMc TCaster, TMc Lapsteel, Fender F-03 Acoustic

Wednesday, 18 June 2014

Not one of my stringed instruments

My wife Elly and I recently went to see Pat Metheny and his Unity Band live in concert at Salford's Lowry Theatre. We were lucky enough to get almost front row tickets but were situated 6 feet away from Pat as the position of the seats were right in front of him. I had been following him since 1977 and I have always been a big fan.
The concert started with him playing a derivative of the guitar shown below.

The one he was playing only had two necks but still had 4 separate runs of strings making up 42 strings in total. Elly and I thought he would just strum it and call it done. How wrong we were. He played every part of the instrument including the wood and it blew every-bodies mind in the theatre.

I did a little research and found out that it was made by Linda Manzer a luthier based in Toronto see here. It gives me food for thought (not that I would be able to play it like Pat does) but I could have a go at making something similar.

Hmm a project maybe for the future.

Tuesday, 1 April 2014

A mold for an acoustic guitar - The Cavendish

A long term task I have set myself this year is to make a series of jigs and fixtures to produce acoustic guitars loosely based upon Jonny Kinkade's plans from his book "Build Your Own Acoustic Guitar". The one he outlines in the book is called "The Kingsdown".
Kinkade Guitars "The Kingsdown"

I have decided to call mine "The Cavendish"
The Cavendish will have my TMC headstock with the following specification:
  • Scale length of 25.5"
  • Body length 500mm
  • Body Depth: 105mm
  • Body Width of 385mm 
  • A thin flattened C electric type neck with a nut width of 43mm.
  • Neck radius 10"
  • The truss rod will be adjusted at the headstock and will be a double action type.

Mold construction


Saturday, 18 January 2014

Friday, 10 January 2014

Telecaster Style Guitar Build - Part 2

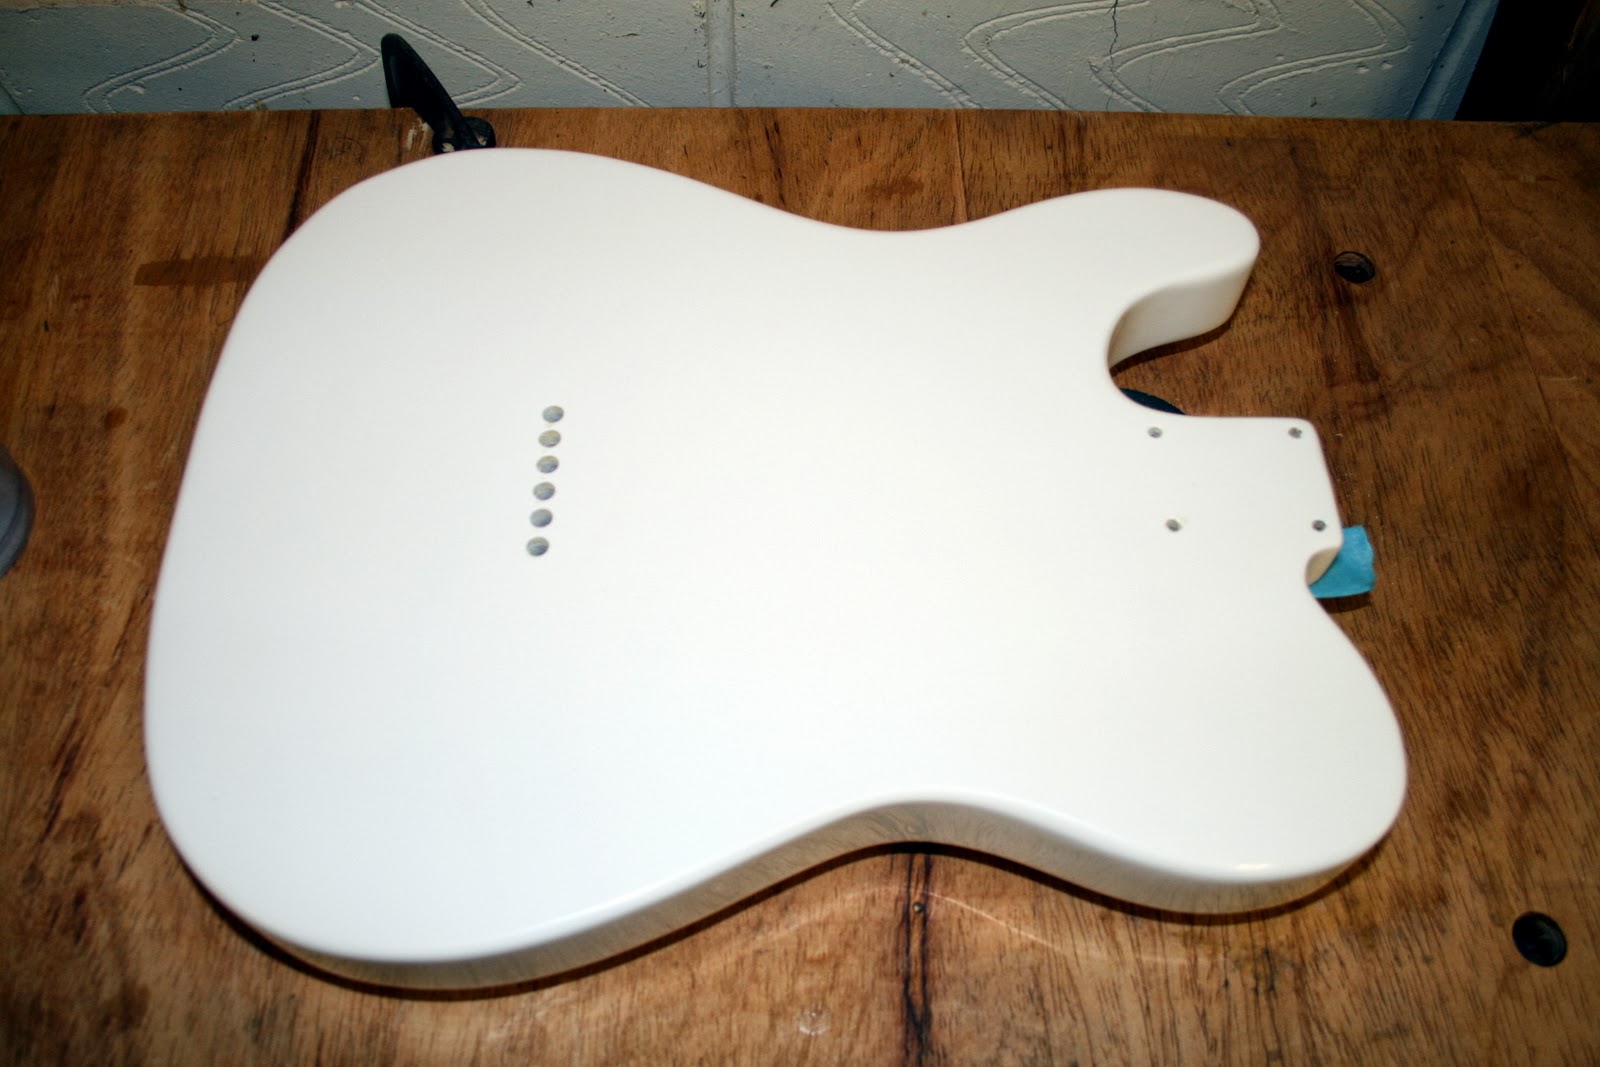
The swamp ash body is now complete using the routing template I showed in the last post. I have painted it white with a Beckers Waterborne pigmented lacquer after first sealing and sanding smooth . The finish off the gun is very good but I'm going to leave it a few days to cure before I rub it out.

Front with some blue tape masking
the neck pocket. Did I ever say I love blue tape?

Rear. No belly comfort curves on this bad boy!

In between a repair job for a violin I've been busy making the neck. I have put a faux skunk stripe in the back and routed the double action truss-rod channel from the front.

Tuesday, 31 December 2013

Telecaster Style Guitar Build - Part 1

So the next project, which is the first for 2014, is a Telecaster style guitar with very few frills. I mentioned this back in August 2013 (see here).
As per that post I had roughly decided what hardware it was to have so bought the hardware and pickups already, I have a hunk of swamp ash left from a previous project and a nice piece of birds-eye maple.
I found some plans for the body over at TerryDownsMusic.com here  http://terrydownsmusic.com/Archive/tele_body_drawing_revD.pdf and it looks relatively straight forward.

I have planed and jointed the swamp ash and glued the two halves together. I didn't take any pictures of the process but here is one taken from a random picture on the internet (you get the idea by now of how to glue slabs together)
Picture from TundraMans website
http://www.tundraman.com

I have also cut out my logo from some mother of pearl.

Wednesday, 21 August 2013

Baritone Guitar Build Part 9 - Completion

So the wiring was completed and the two active Seymour Duncan Blackouts are wired in conventional Neck-Neck/Bridge-Neck mode. I have only used single volume and tone controls too. The wiring diagram is here but as it is on the Seymour Duncan website the location may change in time. Look for 2 blackout, 1 vol, 1 tone, 3 way.
I fitted this wiring into the cavity
And ended up with this
All the remaining hardware was fitted including the nut and the guitar had the Elixir Baritone strings added.
The thickest string, a low B, was 0.068" or 1.73 in diameter and would not fit through the machine head hole. I had to carefully open it up with a 2 mm drill. Fortunately the metal was just brass so was easy to drill. Also the locking anvil mechanism had to be opened in the same process.

The strings were all tightened and then I had to carefully adjust the depth of each of the nut slots with nut files. I ended up with each string clearing the 1st fret by 0.5mm or 0.020". This is as a starting point because I will see how over the next few weeks it reacts. The intonation of the Schaller Hannes bridge was set and the truss rod tightened very slightly.
The clearance at at the 8th fret when fretted at the 1st and 17th frets is about .75mm on the bass side and .25 on the treble side. The string action at the 12th fret when the strings are unfretted is around 3mm on the bass side and about 1.75mm on the treble side. This seems to be ideal for a baritone guitar. I didn't have any frame of reference to refer to for this one so just using my experience building others.

Front view
So here it is in all its glory. The Dunluce IIIB Baritone.

Rear view
That red stain is glorious over
the mahogany.


Friday, 9 August 2013

Baritone Guitar Build Part 8 - Nut making and fitting the hardware

I used a 5/8" Forstner bit to bore the counter-bores for the neck bushings. Then I transferred the pilot holes through to the open mortise.
Then fitting the neck in position carefully transferred the pilot holes into the neck. I then took the neck out of the body and drilled to full size 1/8" diameter x 3/4" deep the holes for the screws. Then I drilled clearance holes in the body.
The screws are actually around #8 or 4mm in diameter and needed some wax to screw into the neck but went in without stripping or breaking.

I drilled some counter-bores with a 6mm drill bit for the magnets to hold the cover plates on. Into these I used some CA glue to fix some rare earth magnets (6mm dia x 1mm thick) in place. There are also corresponding holes drilled into each of the covers. They fix in place with a satisfying "plop" noise and are very secure. No screws showing on this build. To open the covers I have a finger nail grove and slot cut in the cover and body.

Making a nut

The nut is made from a bone blank and was first thicknessed on some sandpaper so it fitted in the dado (slot) I had cut in the fretboard in an earlier post.

Then using a pencil that was cut down the middle with its lead sharpened to a chisel point I scribed the profile of the 1st fret onto the bone
Here you can see the pencil sliced down the middle

Monday, 5 August 2013

Baritone Guitar Build Part 7 - Buffing and Polishing

It's been a couple of weeks or so since I applied the last coat of finish to the Baritone guitar. In that time I've been on holiday to London and done some modifications to the theatre groups scenery. This last weekend I have spent some time building a storage box for table saw blades (see next post) and started to complete the finish on the guitar.
It had some time to harden off and I had one or two blemishes to sort out. Those have now been rubbed out using 1200 grit wet and dry and then burnished with a polishing compound.
My regular buffer is tied up as a grinder at the moment so I found my automotive buffer and using some mild abrasive polished all the wooden parts of the guitar.
You can now see your face in it.
The sides of the body had to be finished by hand as I had a little overspray resulting in some orange peel effect. Careful rubbing with 1200 grit and polishing with burnishing compound on a soft cloth corrected that.
Suitably polished

Thursday, 1 August 2013

The Telecaster (T Style) Guitar

The Fender Telecaster (see here) has been around for a long, long time. In fact it was one of the first commercial solid bodied electric guitars. It was developed by Leo Fender in the early 1950s and has been in continuous production ever since. There are several different models comprising solid bodies, semi hollow bodies, many different pickup/hardware permutations, different fret board materials and different timbers. It has inspired many copies over the years by different manufacturers.

I've decided to make one next as it is a simple spec and easy to produce - yes I know I haven't finished the baritone yet! There will be no fancy wood work or book matched tops on this one.
Of course mine will not be called a Telecaster as that is copyrighted by Fender themselves. I haven't got a name for it yet but it will probably come under the TMc "Dunluce" banner.

Saturday, 13 July 2013

Baritone Guitar Build Part 6 - Sanding, more sanding, sanding again and applying stain

When you make a musical instrument it's not sufficient to just sand to 220 apply some finish and call it done.
I chose a nice water based red dye to use from ToneTech for the mahogany rear of the body. The neck was left natural mahogany to contrast.
After masking off the front embuya and the binding with some blue tape I set to work.

You have to go through several stages after your initial sanding:

  • pore/grain filling
  • sanding
  • more pore/grain filling to miss the bits you didn't quite do before
  • more sanding
  • applying wood stain
  • more sanding
  • apply some more wood stain to replace the parts that you rubbed through
  • more sanding
  • sealing with a water based sealer
  • more sanding
  • apply some more wood stain to replace the parts that you rubbed through
  • more sanding
I think you can see where I am going here!

Anyway after several bouts of sanding and staining I ended up with a nice deep red body and the grain structure is clearly visible. I applied some shellac under the waterbased sealer layer so as not to disturb the stain layer(s). Why didn't I just leave it at Shellac? Well the sealer layer sets rock hard and is a good medium to apply the gloss top coat layers afterwards. The shellac stopped the water based sealer from interacting with the dye causing wash-out :) .

Cover plates stained


Rear of body stained

Next time the neck and body are finished.

Thursday, 4 July 2013

Baritone Guitar Build Part 5 - Neck pocket, pickup and bridge routing

Body routing

To make a pocket, or open mortise, for the neck tenon it is necessary to have a router jig. I made mine from a few pieces of scrap 3/4" ply and some jig making hardware. The two halves of the template are held apart on a slight taper that follows the taper of one of my typical guitar necks. The centre piece is an adjustable stop.. Fit the neck into the jig until it is snug on the two edges and simply slide the stop up to the heel of the neck. Tighten the handwheel and then the template is set. Position the template on the guitar body and using a pattern following router bit simply rout out the cavity to the required depth. It the neck has designed to be angled backwards then you can shim underneath the template at the handwheel end until you get the required angle.
Here is a shop made adjustable router template

Thursday, 27 June 2013

Baritone Guitar Build Part 4 - The body slab and imbuya cap

The main slab of the body is African mahogany with a book matched imbuya cap. Bill Quinn over at ToneTech Luthier Supplies showed me a nice piece of South American imbuya that he'd had resawn to book match it. I pondered over it for 30 seconds and just had to have it.
The imbuya boards on my
kitchen countertop
Drilling the pickup cavities
The next thing I did after hand planing the mahogany board flat was print out my plan full size and glue it onto a piece of hardboard (masonite). Then I cut it out on the bandsaw using a spokeshave and sandpaper to blend in the curves.

Sunday, 23 June 2013

Baritone Guitar Build Part 3 - The neck and fretting

The neck

The neck is laminated from quartersawn sapele
and 5mm thick rock maple.
 It is roughly cut to shape in side profile with a 10 degree headstock. I glued some sapele blocks to get the full width. The truss rod channel was routed out, two way truss rod installed and the fretboard glued on. The picture above shows the fretboard prior to the inlays being glued in.
Some luthiers scarf joint the headstock to minimise on stock use but I normally use 8/4 stock (2" thick) quarter-sawn boards and am able to get two necks out of one board with a 10 degree headstock.

Wednesday, 19 June 2013

Baritone Guitar Build Part 2 - The fret board

I opted for using ebony for the fretboard and nickel silver frets. I also wanted to inlay the board with some nice red abalone I had. First of all I chose a nice theme for the inlay and this was an Arabesque pattern I saw a few years ago.
Using a jewellers saw and some fine blades along with a simple piece of softwood with a slot and a hole I broke several blades but ended up with a nice set of inlays.

Then I run the ebony through the jointer to flatten one side and then ran it through the thicknesser to get it around 7mm (9/32") thick.
The next task was to put the radius onto the board. I used a 12" radius aluminium fret levelling beam from StewMac with some self adhesive sand paper of 80 grit to do the initial shaping.


Essentially the aluminium beam has a concave radius of 12" machined into one face. You stick the sandpaper onto this face.
Then with the board fixed to the bench with some double-sided tape you transfer the concave radius to the board by moving the beam back and forth sanding a convex radius onto the board.

I then cut the board edges slightly larger than finished size on the band saw.


Monday, 17 June 2013

Baritone Guitar Build Part 1 - The Specification

Back in 2011 I had the idea of building a baritone guitar after seeing one being used by Joe Bonamassa. For those of you who don't know a baritone guitar has a longer scale length than a regular guitar and is normally tuned from B to b on a six string guitar (B E A D F♯ B) with thicker strings and longer scale lengths.
Over the years a number of companies have made and still do make these types of guitars but they are not so common.

I myself have been making guitars/basses for a number of years but never made a long scale one such as this.
So I designed it on AutoCad (before I got hooked on Sketchup) and it has the following specification:

Body


  • Double Cutaway body
  • Main body slab - African Mahogany
  • Top - bookmatched South American Imbuia (Ocotea porosa) burl

Neck


  • Neck - Sapele and maple
  • Fretboard - Ebony
  • No of frets - 24 
  • Scale length - 700mm 
  • Fretboard radius - 12" 

Hardware/Electronic

  • Pickup system - Seymour Duncan AHB-1 Blackout set - active electronics
  • Bridge - Schaller Hannes
  • Machine heads - Schaller M6 2000 Locking
  • Strap button - Schaller security locks.
All the hardware is black.
Baritone CAD design
As can be seen in the picture all aspects of the design have been covered with the hidden structures/routs shown.
After the design was completed the first part to be made was the fretboard and that will be covered in Part 2.


Wednesday, 18 July 2012

Dunluce II-L lapsteel

Here is one of my designs for a six string lapsteel guitar.
The guitar is tuned in G6 that is, from lowest to high, B G E D B G although any tuning can be used.
The full specification is below:

Dunluce II-SC "Rapter" Guitar

Dunluce II-SC Rapter

Dunluce II SC Rapter

Specification:

  • 6 string double cutaway electric
  • Nut width 43mm at headstock end. Made from bone.
  • 25.5" scale length
  • 21 fret finger board
  • Schaller M6 machine heads chrome
  • Seymour Duncan SH-4 JB (Jeff Beck) in the bridge position
  • Seymour Duncan SH2N-4C Jazz in the neck position
  • Schaller hardtail bridge with thru stringing

Dunluce IB bass guitar

Here is a few pictures of the construction of this simple bass guitar I made very much based upon the Fender Precision bass.
Dunluce IB Bass
The body is made from ash, the neck is maple and rosewood.
The scale length is 34" and the bridge is a clone fully adjustable.
The electronics are really basic having a single Seymour Duncan Basslines SPB-3 Pickup Quarter-Pound pickup, a volume and tone control. That's it!

I made the neck flatter than normal with a 14" radius and the normal 20 frets. All the hardware is chromed high end Schaller.
The neck is just bolted on with 4 screws and the strings are standard 40 to 100s.

The tone however is pure 60s thud and ideal for rock, soul, R&B, jazz (to a certain extent) and most other genres. The Seymour Duncan SPB-3 is a higher output pickups and works well into most bass amps or DI's straight into the desk.

I finished the guitar with traditional Lake Placid blue nitrocellulose paint with clear gloss nitrocellulose lacquer over the top.