Showing posts with label Workshop remodelling. Show all posts

Friday, 4 April 2014

Spring cleaning the shop

This is one of those jobs I'd been putting off for a while (or saving for a rainy day). The shop was rebuilt at the end of 2012 (see here) and when restocking it there were a lot of boxes containing equipment, detritus, old bits of wood and plywood. I just put them onto the shelving for that elusive sorting out time in the future.
Well the time has arrived.

Over the last 15 months I had obtained a lot of timber from various sources and put them neatly on the wood rack (see here). Inevetiably during that time pieces were shortened, the wood pile disturbed etc to the point where I didn't know what I had. In fact it had become quite a mess. The first spring clean job was to put the offcuts and anything shorter than about 1m on to the top shelf but crosswise instead of lengthwise. This allows me to categorize and label the timbers, oak, mahogany, beech etc. This methodology was carried to the long lengths too but placing them longitudinally labelling the side or ends of the wood rack so I now know precisely what I have. I just have to keep this rack tidy and then I'm all set.

Shop Plan View
This is so you can orientate yourself
for the following photos.

Wednesday, 19 December 2012

Shop transformation Part 7 - Fitting out

I ground the floor smooth with a diamond grinder hired from HSS, who are a national tool hire company,  including a large vacuum extractor. I wasn't going to use my own shop vac! That was hard work as the actual grinder is very heavy and my hip was not in the best of conditions. However all I had to do was lean on the machine and move it from side to side so it was not too onerous. Needless to say it generated a lot of concrete dust but I was rewarded with a nice, flatish bare concrete floor.

The next day I started painting the floor. Or rather I should say painting 2/3rds of the floor! According to the Regal Paints website there should have been sufficient paint for the entire 410 square feet with a little leftover. In practice there was only enough sealer coat for around 250 square feet or roughly 2/3rds of the shop.

Wednesday, 21 November 2012

Shop Transformation Part 6


The keys to the new shop were finally handed back to me on November 16th 2012. The concrete slab had been poured during the week over the rubble in the old inspection pit and was still hardening. All the final jobs had been completed, all the electrics worked (not that I thought they wouldn't!) the cladding was all in position.

The builder had gone into great detail making sure all the stainless steel nails holding the cladding on were in a straight line. He said there would be nothing worse than sitting outside the shop on a warm evening admiring the man-cave with your favourite beverage in your hand and noticing that all the nails were out of line. He even got one of his guys to go around every nail (more than 1500!) and using a nail punch knock them all below the surface. Now that is attention to detail that is admirable and that guy deserves a beer.

Last night, Monday, while still recovering from my hip operation last Wednesday November 14th I set about applying one of the first coats of white masonry paint to the internal block walls with a 12 inch roller.
Did I ever mention I don't like painting? I managed to do 1 and 1/4 walls last night. However the mortar is under the level of the block work and needed a paintbrush to pick out the seams. This is going to take forever!
Did I ever mention I don't like painting?
Why don't builders flush the mortar up to the surface?
There will be another night tonight of painting to look forward to. Maybe I should employ my step dad who is a retired painter to do the job....

Did I ever mention I don't like painting?


Tuesday, 20 November 2012

Shop Transformation Part 5

This week has been a really busy week commencing November 5th 2012 for my builder.
They have:

  • finished all the cladding,
  • clad one of the doors (the other one will be done next monday)
  • installed all the insulation and drywall in the roof.
  • installed all the T8 lighting
  • installed all the power outlets
  • installed all the circuit breakers


We had the big switch on Thursday and when initially powered up the tubes were pink in the centre and the gas was flickering inside the tube. After 30 minutes they were all a consistent white colour and the gas flicker had gone. After an hour it was really bright.
It seems that there appeared to be a burning in period before full brightness was achieved.

For anybody who hasn't used high frequency battens with T8 fluorescent tubes then you are in for a surprise. They switch on immediately with no flickering and they are at about 85% full brightness. Then after 5 minutes they are at 100% brightness. I was very impressed and I think after taking advice from the WoodTalkOnLine community about how many lamps I should install in my space I think I have got it right.

The brackets for the gutters finally arrived from the manufacturer on Thursday night. They had made them incorrectly and we had to wait over a week before we got replacements. It was their error rolling them to an incorrect radius.
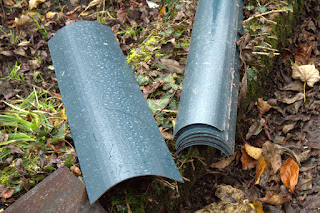
The ones with the larger radius
are the correct ones
This view shows the gutter with its bracket
secured with 3 bolts

Jon the builder had fun fitting them as they needed sealant applying between all the joints. The problem was he had put the gutters up and it started to rain. Where they were jointed together the seals hadn't quite set and there was a huge leak of water. He went home that night feeling dejected. However the next day he came back armed with a gas gun and some tar backed mastic and plugged the leak from the inside. Now there is a slight trickle and we think that a little sealant applied around the outside of the seam will seal that.
These gutters are intended for factory buildings and I think slight leaks from 50 feet in the air are probably tolerated. However we have come to the conclusion that although the roofing system is brilliant the integral gutters are not so good. The manufacturer may need to go back to the drawing board.

Now we just await the concrete being poured into the inspection pit to cap it off. There is a little more minor work to be done next week and I should then get the keys of the shop officially handed to me.

Sunday, 4 November 2012

Shop Transformation Part 4

There was a lot of action this week commencing Oct 29th 2012. After the trusses were put into place the roof sheets went on. These are a profiled steel sheet, coated with a plastic called plastisol. I chose a profile called Accord FlowTile from Steelroofsheets.co.uk in slate grey. It actually looks a shade of blue-green to me but it looks great. The profile of the sheets looks like concrete roof tiles from the ground and you would never guess it was steel. I have also had it coated on the underside with anti-condensation coating which is an option. This is some sort of wicking material.
The manufacturer sent the wrong brackets to secure the gutters to the roof so we are still without drainage. I'm assured that they will send me the correct brackets the week commencing November 5th.
Accord Flowtile roofing sheets
It's autumn at the moment!
The actual positioning and fixing of the sheets didn't take very long. They are held on to the roof with self drilling and tapping screws that go straight into the wooden cross battens.

Saturday, 27 October 2012

Shop Transformation Part 3

The trusses are installed.

We had a slow start to the week because my builder had a couple of days holiday to celebrate the 1st birthday of his daughter. Then during the celebrations 50% of the people there were struck down by a food bug. This caused Jon and his brother to miss a further 2 days due to illness while they recovered.
Anyway Friday came and it was a real cold and crisp autumn (fall for my North American friends) day.
There were crisp dry leaves about 6 inches deep coating the inside of the shop that had fallen from the ash tree which towers above the shop in a neighbours garden.
These were all swept out before the guys could get to work. The trusses started appearing in their finished positions soon afterwards and by the end of the day they were all up and in a temporary braced state.

The guys had even put the cedar cladding onto the end gable and it looks great from my neighbours side of the fence. I just hope he refrains from letting his ivy grow over it like it did on the previous old shop roof.

I did a few pictures of the progress so far. Hopefully next week I should have a roof on and the shop is then weatherproofed.

The shop with trusses on

Saturday, 20 October 2012

Shop Transformation Part 2

Here are a few more pictures of the shop progress.
The huge trusses on the truck are not mine!
They were for another building site.
The ones for my shop are the smaller ones.


The walls are up now. I call it
my Berlin Wall. They are a lot
higher in reality than I thought on my design.


Thursday, 11 October 2012

Shop Transformation Part 1

So the builder started with an empty shop, complete with a previous owners bored childrens' graffiti on the concrete panels, to new blockwork internal skin in just 4 days. The pictures speak for themselves:

I've never seen this shop so empty!
I didn't see any of the graffiti as your eyes just got used to it.
Once there was nothing in there it's glaringly obvious