Wednesday 7 June 2017

Digital radio, LED lights and an external antenna

The general lighting in my shop is very good. However I did notice that there were dark spots particularly at my assembly table and bandsaw. I looked at the new LED lighting strips meant to replace standard fluorescent strips but in the area I wanted to increase lighting levels strips would not be practical.

I then looked at RO80 lamps and they suited the area. I bought 10 E27 bases and fixed 5 of them in place. One per roof joist over the assembly table and one behind the bandsaw and one in front of the bandsaw.
E27 Lamp Holder

They were wired so that I could have a separate bathroom type pull switch for the two locations.
Bathroom Pull Switch

The LED lamps arrived and I screwed them in. These are cool white 5000K, 700 Lumens, 9W, 240 volt lamps. They have an E27 screw thread and have an equivalent lighting output of a 75W halogen lamp.


I switched them on an the difference was very noticeable. I could now see what I was assembling!
The augmentation of lighting around the bandsaw was also very good.

Lighting above the assembly table

Lighting fore and aft of the bandsaw

5 additional LED lamps in situ.

Then came the bad news. The shop music system has a digital DAB/DAB+ radio receiver. This is the standard in the UK and some other parts of the world. It also has a conventional FM mode. The antenna for this was inside the shop. This is not an ideal situation as the roof is metal and cuts down the signal profoundly. When the new lights were switched off the reception on DAB and FM was just about acceptable. There were some stations that "burbled" as per DAB reception but that was ok to put up with.

When the LED lights were switched on the DAB reception was completely blocked. I put this down to the electronics in the lamps generating EMC (probably inducing it into the electricity supply wiring) and overloading the front end of the radio receiver. I switched over to FM and there was also noise on there and some stations could not be listened to especially in stereo.

I had a quick look on Amazon and found a supplier of external DAB compatible antennas. These were fairly cheap so I bought one.


When it arrived the antenna was assembled and clamped to a 10 foot long aluminium pole. DAB in the UK is vertically polarised so I positioned the folded dipole in a vertical orientation.
The outside of the shop already had a suitable antenna bracket fitted to the external wall so I simply mounted the pole into this. The 75 ohm cable was routed through the inside of the tube.

DAB Antenna vertically polarised mounted on the outside of the shop

Then a hole was drilled through the brick wall into the shop and the cable passed through. The hole was sealed with some external mastic sealant. Inside the shop the cable was routed up and along the walls, clipped into place and passed through into the shop music system. The cable was cut to length and the connector fitted. This was then connected to the radio receiver.

The receiver was powered up and the reception was clear and noise free. The LED lights were then powered up and there was absolutely zero interference and no noise. The new antenna worked fine and the LED lights work great.

Wednesday 31 May 2017

Driveway gates - Part 7 - cladding

The western red cedar cladding was fitted next. This was premade tongue and groove cladding from a local commercial wood dealer. The only thing I had to do was fit the tongue into the groove I had milled in the stiles. It is crucial that a spacer of about 4mm is used when fitting each board to provide room for expansion/contraction. Each board was fitted with a series of stainless steel screws pilot drilled into the iroko.

Several coats of Sansin exterior weather seal was applied. This is a beautiful waterborne finish that build up a nice satin appearance with a deep colour after many coats. It can be applied with a foam brush or sprayed. I opted to use a foam brush.

Next all the hardware was fitted. 3 banded hinges, 3 shoot bolts, and a vertical drop bolt into each leaf. Fitting of the stays was left until final fitting on site.


The job was now completed. The old gates were sawn up and became firewood having served their purpose for the best part of 30 years

Driveway gates - part 6 - Drawbored and wedged M&T joints

I had used wedged mortise and tenon joints on a previous gate project. One of the problems I found with this technique is the wedges can have a tendency of pushing the joint apart unless you clamp the joints first of all. Once the glue has set there is no issue of course.
The width of these gates is slightly bigger than the capacity of my largest clamps. These clamps have the facility of joining two together.
First of all one of the clamp heads is removed totally from one of the clamps. The adjoining clamp requires its movable clamp head turning through 180 degrees. Then the two clamps are simply joined with a large nut and bolt.zz
The glue up using West Systems 105 and 205 epoxy.
Draw-bored and wedged tenons make for an immensely strong joint

Each one of the tenons has a 5 degree wedge removed from either side of its width. I made a template from 1/4" plywood with the correct angle.
I also used the same template to cut some 5 degree wedges from some 1/2" scrap iroko stock. There are a pair of wedges required for each mortise and tenon joint.

I decided to use the drawboring technique "recently rediscovered" by many woodworkers. If you don't know what this is then Marc Spagnuolo and Christopher Schwarz both describe the technique on their respective websites/blog.

Marc's is here www.thewoodwhisperer.com/videos/drawbored-mortise-tenon/
Chris's is here www.popularwoodworking.com/techniques/joinery/drawboring-resurrected

I drilled a blind 10mm (3/8") hole 60mm (2. 3/8") from the face of each stile. After dry fitting the tenon into the mortise a bradpoint bit was used to transfer the centre of the hole to the tenon.
The tenon was disassembled and the centre point was then moved 1/16" closer to the shoulder. A 10mm hole was then drilled into the tenon.

A batch of 10mm x 40mm long dowels were sawn to length. Then a 15 degree bevel was sanded into one end of each using a disc sander.


Driveway gates - part 5 - Diagonal braces

The stiles and cross rails were dry assembled, squared and clamped up. The table saw mitre fence was set to 38 degrees and each one of the diagonals had one end cut to this angle.
Each one of the diagonals had to be marked to the length and angle that was subtended at the other end. They should have been all roughly the same but due to discrepancies in machining there are always slight differences.
The intersect with the mid rail  was marked onto the diagonal. This angle was transferred to the table saw mitre gauge using a sliding bevel. The cut was made by sneaking up to get a good match. Then the piece was dry fitted into place. The edges of the diagonal was transferred onto the mid rail. The diagonal between the mid rail and top rail was lined up with the pencil lines.
This same process was then used to cut its upper angle.

The decision had also been made early in the design to use floating tenons to anchor the ends of the diagonals to the crossmembers. This required cutting 10mm (3/8") slots into each piece using a router. If you have a Festool Domino XL then use that instead. I don't so used the router method.
My mortises were cut 25mm (1") deep and the slot length is 100mm (4"). I marked the start and end of each mortise onto the face of each diagonal and crossmember when they were dry fitted in place.

Balancing a heavy 1/2" router onto a 1" wide board is not easy so I ganged a piece of stock onto the side of each piece with clamps. This gives a wider bearing surface. I also used a shop made plexiglass base screwed onto the router to fill in the cutter void and increase its length.

Clamps at either end to create end stops.

The resulting mortises obviously have rounded ends. Loose tenons were made to be a hair shorter than 50mm (2") and each edge had a 1/4" routed radius to match the mortises.
The loose tenons were glued into each of the diagonals to aid assembly further on in the process.
Shop made loose tenons and the corresponding routed mortise in a diagonal brace
xx

Driveway gates - part 4 - The Rails

Each of the pairs of gates are different widths. The end detail of each tenon is the same and the same process used for each.

The rails are made from 4/4 stock and was milled to final dimension after a period of acclimation to the shop. The width of each rail is 145mm (5-3/4"). Each tenon is 12mm (1/2") thick and 90mm (3-1/2") wide. Each tenon is also made intentionally 5mm longer than required. This is so the length can be cut flush with the stile after glue up.
The tenons are not central but are 11mm from one face. The other side of the tenon is 2mm from the other face.

The shoulders of each of tenons were cut on the table saw after marking with a marking knife. This also severs the grain to minimise tear when sawing.

Waste stock from each tenon was cut off by hand with a rip saw. If the tenons had been shorter then a mortise jig could have been used on the table saw.

The tenon faces were then cut to final depth using a router mounted in a custom tenon router sled. I showed this design in an earlier post tmcwoodworks.blogspot.co.uk/2014/08/garden-gate-project-part-3-top-and.html
Router Sled
The business end of the router sled

Each tenon face was then smoothed with a rabbeting block plane. This ensured that a nice sliding fit in each mortise was made.

Finishing off with a rabbeting block plane
The upper rail of each door has a triangular shaped board glued to the rail. This serves two purposes:

  • Supports the cover rail that protects the end grain of each T&G upright board
  • Provides an fixing point for a shoot bolt. The door can be locked from the outside by simply reaching over the top of the door. There will be padlocks lower down the inside face of each door that enable secure locking from the inside at night.
The mid rail is at a suitable position for future anchoring of automatic gate openers.

Driveway gates - part 3 - The Stiles

The stiles were the first items to be batched out. They were milled to rough thickness and width and left a few days to acclimatise to the shops conditions. After a few days they hadn't moved much and were brought to final dimensions. This batch of iroko is very good.

The lower ends were squared off and all subsequent dimensions were made from this face. The important dimensions in this case are the start and end of each mortise. These are through mortises so are transferred to both sides.
Mortises cut into the stiles

Each mortise was cut with a 12mm (1/2") long series router bit. The length of the bit would not cut to the centre of each stile and is left about 1/8" of meat between the bottom of each mortise. This was simply drilled and chiselled out. The ends of each of the mortises needed to be squared off due to the design using wedged joints. I used a 1/2" mortise chisel to achieve this.

The 1/4" x 1/2" deep slot for the T&G boards was routed into the face of each stile using a variable kerf slot cutter on the router table.

The upper end of each of the stiles was left long and will be cut to length after final assembly.

Driveway gates - Part 2 - Wood selection

A big pile of stickered Iroko acclimatising in the shop
I decided to use a durable timber for the main frame of the gates. The timber I chose was Iroko from West Africa. It has similar properties to Teak in that it is rot resistant, resistant to insect attack, stable and durable.
Iroko Sealed
Picture from The Wood Database

It is also quite hard on the Janka scale (1,260 lbf) so might be suitable for a future workbench. However it is also very hard on tooling. There can be pockets of calcium carbonate in the wood and this has a blunting effect on tools.

I ordered 9 boards of 10" x 4/4 x 9 1/2 feet (250 x 25 x 2950mm) and 4 boards of 10" x 8/4 x 8 feet (250 x 50 x 2450mm) and they were delivered after a long delay (the supplier was inept and I will think twice about using them again). This is sufficient for all four doors and I have included a 25% to 30% contingency.

I have the boards on the floor of the shop at the moment to let them acclimatize.
4/4 and 8/4 Iroko stock and some premilled WRC T&G 

A few of the milled uprights for the gates made from 8/4 Iroko

Driveway gates - part 1

After making a fine oak gate for the entrance to my house my wife put a request in to have both sets of our driveway gates remade. The existing ones were about 30 years old and 20 years old respectively and had been installed at different times. They were of different design but had functioned well for years.

a
Past their sell by date

Many years of sterling work but they needed replacing
They were made of softwood that had been tanalized so were at the end of their lives. I had noticed an orange fungus had been growing on one set. Also there was a white discolouration appearing at the bottom of the same set. On closer investigation it appeared that the gates were rotting in several places and the fungus had just appeared last year (2015).

The other gates did not have signs of the fungus but had rotted in places.

The time had come to make new replacements.

Western red cedar cladding

I like the western red cedar that I have used in many outdoor projects including cladding parts of my shop so wanted to incorporate it into the gates. It is rot and insect resistant so is great for outside projects. Tongue and grooved WR Cedar will be used for the cladding panels in the gate. WR Cedar is lightweight but not very good for load bearing so I chose iroko for the framework of the gates.

Iroko

For those who don't know about this timber it is a hard wood that comes from tropical parts of Africa and is grown sustainably. It also is very similar to teak (and also WR cedar) in that it doesn't need any treatment outdoors. It has a natural oil which makes it rot proof and insect resistant. As I don't like the maintenance chore of constantly painting outside items this is ideal for me.
Iroko starts out quite yellow but overtime darkens to a rich brown colour. This must be similar to how cherry changes colour overtime. The contrasting western red cedar only greys over time. However when it rains it develops a fantastic mid brown colour, The contrast between the timbers will probably stay for a while but I think they will probably develop a grey patina over time.
It is slightly lighter in density than white oak but will be still quite substantial. I'm led to believe that it works well but has quite a blunting effect on tooling. Only time will tell.

Design

As many readers know I use Sketchup extensively in my designs so it is no different here.

I measured the original doors as they have proven to work well for us. One set it slightly wider but much taller than the others. I designed that set first.

Stiles

The finished sizes of the stiles are 100mm (4") wide X 45mm (1-3/4") thick.

Cross members and bracing

The cross members and diagonal bracing are made from 25mm (1") thick X 150mm (6") wide stock.
The WR cedar boards are premachined T&G 144mm (5-3/4") wide x 19mm (3/4") thick.
View from outside of largest gate

View from inside of largest gate

Designing the other set was really easy as I simply copied the existing design into a new project. Then I changed the sizes of each component, moving them as necessary, using the push pull tool to shorten their respective lengths. The resulting design for the smaller gates gives the same overall impression.


View from outside of smaller gate
View from inside of smaller gate


Construction

All joints will be mortise and wedged tenon. I will also dowel the joints for extra strength. The adhesive will be epoxy. All fasteners have to be stainless steel or heavily galvanised as both species of timber react with iron in regular mild steel fasteners.

Tuesday 23 May 2017

Bosch GSR18V-EC FC2 FlexiClick Drill and 18v 4.0 AH Wireless Battery Review

An essential tool for use in the shop is some sort of drilling device. In the old days a brace or  "egg beater" drill would suffice. Nowadays they have been supplanted by cordless drills. I needed an extra cordless drill for the shop as sometimes you need a few drills setup to do different tasks (drilling, countersinking, screwdriving) so I thought I would have a look at the Bosch range.

I already have several Bosch Blue Professional tools and seem to have bought into the LBoxx systainer storage system. If you are into Festool or Dewalt of course you may have gone down their respective storage routes.

The Bosch Professional 18 volt family is wide ranging, Drywall screwdrivers, impact (percushion) tools, hand held circular saws, jigsaws, impact drivers/wrenches, combination tools and of course handheld drills.

The Bosch GSR18V-EC is part of the Bosch Professional 18V family and has a powerful EC brushless motor. It also has the "FlexiClick" system enabling it to take a range of interchangeable tool holders.

In its basic form it comprises a hex tool holder 


It also comes with a 13mm (1/2") Auto-Lock chuck. No tools are needed for the latter like most drill chucks these days.

The brushless motor gives a long life and low battery drain. The drill was supplied in an L-Boxx 136 with internal moulded dividers.


The drill has the usual controls

  • 2 speed Gear control Low/High
  • Direction rotation clockwise/anti-clockwise (counter-clockwise US)
  • 18 position torque setting
  • Battery charge condition
  • Bright LED illumination

So nothing new there as most drills today have those features.

Other features

  • Tool belt clip. The manual says this can also be used to hang the tool from a ladder - although I haven't yet tried that feature out!
  • Replaceable colour clips for easy labelling and identification of the tool - I don't think I will use that feature as I currently only have one of these!
  • Mountable bit holder for easy transport and storage of bits on the tool - useful I think.
  • Electronic Motor Protection (EMP) protects the motor against overload - a good feature.
  • Bosch Electronic Cell Protection (ECP) which protects the battery against overload, overheating and deep discharge - a great feature. 
  • Kickback control. When drilling large diameter holes wen you emerge on the other side of might hit an embedded nail this will prevent the drill from snatching from your hands and kicking back. I think this is a great safety feature that I've not seen on other cordless drills.
  • Very compact head length (173mm or 6-7/8" long) but still retains high power - it is surprising how short the tool actually can be with immense power reserves.

Battery packs

There is a large range of Lithium Ion batteries are available, wired and wireless so you can choose the best one for your needs.
There wasn't a battery supplied in this kit and there is a wide range to suit all tastes.

I decided to buy the wireless charger and the new 4.0AH CoolPack wireless battery. This is promoted by Bosch as being the "Worlds first wireless charging battery". I think they left out "system on a power tool" on their promotion material. Now I'm not sure of that claim as I've been using a wireless charging (Braun Oral B) toothbrush for years now and some mobile phones can also be charged wirelessly! I think it is a matter of time before all major manufacturers give the option of wireless charging. At the time of this writing this blog (May 2017) neither Festool, Makita, Milwaukee, Portacable nor Dewalt have a wireless charging option. I haven't checked any other brands yet.

The battery also has a bush button "charge left" indicator. This is 3 LEDs that light up according to how much charge is left. This can be seen on the phot above just below the BOSCH logo and lettering.
The battery itself is an induction charged device and simply is placed atop the induction charger GAL 1830 which I also bought. The battery can still be mounted on the tool so simply placing the drill on to the charger works well. The battery slides into place onto the toolwith a satisfying click. I placed the whole drill on charge for about 45 minutes before using it the first time.


Accessories

There are a range of attachments that you can purchase separately.

  • Right angle drill adapter
  • SDS rotary hammer adapter
  • Offset drilling adapter


From the 3 extra accessories I can see the offset drilling adapter to be very useful especially when fitting drawer slides. This adapter enables drilling very close to internal edges and walls. That might be a future purchase for TMc Woodworks.


The right angle adapter enables drilling at 90 degrees to the axis of the drill motor. Again great for drilling/screwing in confined spaces.


I can't really think that the SDS adapter would be any use for me as I already have a corded SDS drill. I suppose if you are up a ladder trying to drill holes in brickwork then it may be ideal for you. It will drill deep holes up to 10mm (3/8") diameter into concrete.


In use


I have had this a short time now and find that it is very comfortable to use, relatively lightweight, has masses of power and torque. It is far better than any of the battery drills I've used or still own. Drilling large holes in wood does not faze this drill. A comparison to my older drills is that the Makita would definitely bog down when drilling larger holes. The Bosch on the other hand just carries on with no changing in motor pitch.

The adjustable torque control is excellent. I've found when drilling through 3/8" holes in wood results in a relatively clean exit hole (without any backing). Of course my drills are all newly sharpened and the torque control was set to 6. When the bit broke through the clutch slipped and I found the bit hadn't gone fully through. Another slight squeeze of the trigger resulted in the bit slowly exiting the hole and very little fibre tearing. Obviously if drilling holes in furniture always have a backing board to ensure a clean exit hole.

The gearing is very smooth and the change from low speed to high speed is via a sliding switch. The drill did need to be stationary when changing gear.

Charging was a revelation. The charger can be remove from its carrier and placed on a bench, inset into a bench, works through thin acrylic or glass (so could be built into bench or charging station, doesn't get warm and is quick charging.
I don't think I'll go back to conventional chargers after trying this one out.

The LED light stays on for a few seconds after letting go of the trigger and is angled to illuminate the drill bit. Nothing different there from most other modern battery drills.

The belt clip would hold onto my belt but I don't think I would make much use of it.

The downside
I also found that fitting the bit holder to handle stopped the drill from sitting properly into the L-Boxx systainer. I removed the bit holder.

Colour coding the back of the drill is possible with the supplied plastic inserts but I found that pointless. If I had about 4 of these drills it might make more sense but I still don't think I would use colour coding.

Changing the chuck for other tools is very easy and quick. The drill body can be used on its own with screwdriver bits. There is a positive locking 1/4" holder built in.

Conclusion

There is nothing unusual in the operation of this drill as it is just that - a drill. However the addition of the optional attachments make it an attractive offering.
The main reason for buying this was to try out the wireless charging battery. It is excellent and make the drill a worthwhile investment. There are currently high capacity versions of the battery available (up to 6Ah) and Bosch is expanding the range of tools that can use the wireless batteries.
If you still have a conventional contact charged battery in a recent Bosch blue tool then you can change over to wireless as they are compatible. Check out the Bosch website to ensure beforehand though.


Friday 19 May 2017

The rising price of old woodworking tools

I get occasional emails in my inbox from online dealers of second hand or pre-owned tools. I'm mainly interested in woodworking tools but these dealers also have tools from other crafts.
A couple of years ago (2015) the price of these were acceptable but due to the popularity driven by woodworkers to get hold of, for instance, old Stanley or Record hand tools the prices in the UK in 2017 are rocketing. A real case of  supply  and demand dictating the prices.
Now some of the lesser used tools are at the point of being the same or more than their modern day brand new premium tools like Lie Nielsen or Veritas (assuming that LN and LV are producing their version of those models). I recognise that dealers still have overheads to run their websites, have warehousing costs, wages to pay etc so they do have a mark up.
I have a fair selection of tools, old and modern (bought in the "golden age" of buying a few short years back) so I no longer have the need to collect. However if I was in the market for a speciality plane like a #95 Edge Plane (not that I am BTW ) I think I would buy a new Lie Nielsen one rather than spend more on a vintage Stanley. I don't think I would use the Stanley, instead treating it with reverence and it would end up in a display cabinet. Of course if that is what you want to do then go ahead. I like to use tools for what they were designed for - work.

That's not to say there are no bargains left to pick up. There are other websites where individuals can still sell their grandfathers rusting #4s and old chisels for a few bucks. Craigslist and Preloved both spring to mind. eBay of course can be a nightmare as you have to bid against somebody else (unless it has a fixed Buy It Now price) and may end up paying more than you should.

So if you are in the market for relatively cheap pre-owned tools best to scour sites like the latter mentioned, yard sales or flea markets rather than going to a dealer.

Tuesday 16 May 2017

Tracksaw setting gauge

For all you users of tracksaws (Festool, Bosch, Makita etc) here is a design of a measuring gauge to make setting cuts far easier.

The one problem with cutting sheetgoods using a tracksaw is measuring. You create a good edge from stock by cutting about 1/8" off. Then using a tape measure and a pencil make a couple of pencil marks relative to this edge.
Then you set the tracksaw track onto the pencil marks and suddenly you can't see them. You move the track a little to expose the pencil line. Go to the other end and find that pencil line is 1/8" away from the rubber splinter guard. You move it back to the line, goto the other end and find you have obscured the pencil again.

This scenario does happen and sometimes you end up with a board cut that is slightly out of parallel and oversize because you covered the pencil line. There must be an easier way of setting this.
The good news is there is.

Steve Maskery of Workshop Essentials designed a simple setting gauge with integral rule that compensates for the track width and results in parallel, accurate width, repeatable cuts every time.
I take no credit for designing this but set about making one.
(Steve also says this has probably been done many times before in the dim and distant past but he was the first person to show it being created on video.)

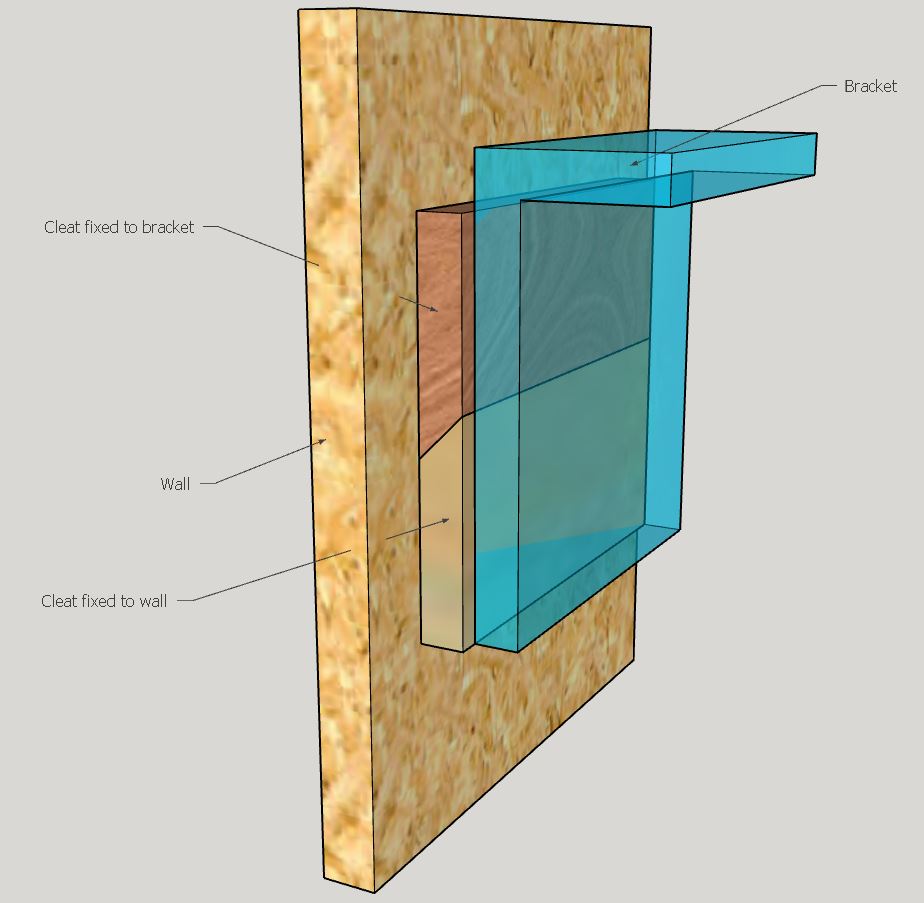
Here is my Sketchup version of Steve's original design
Tracksaw Gauge Head


Stock

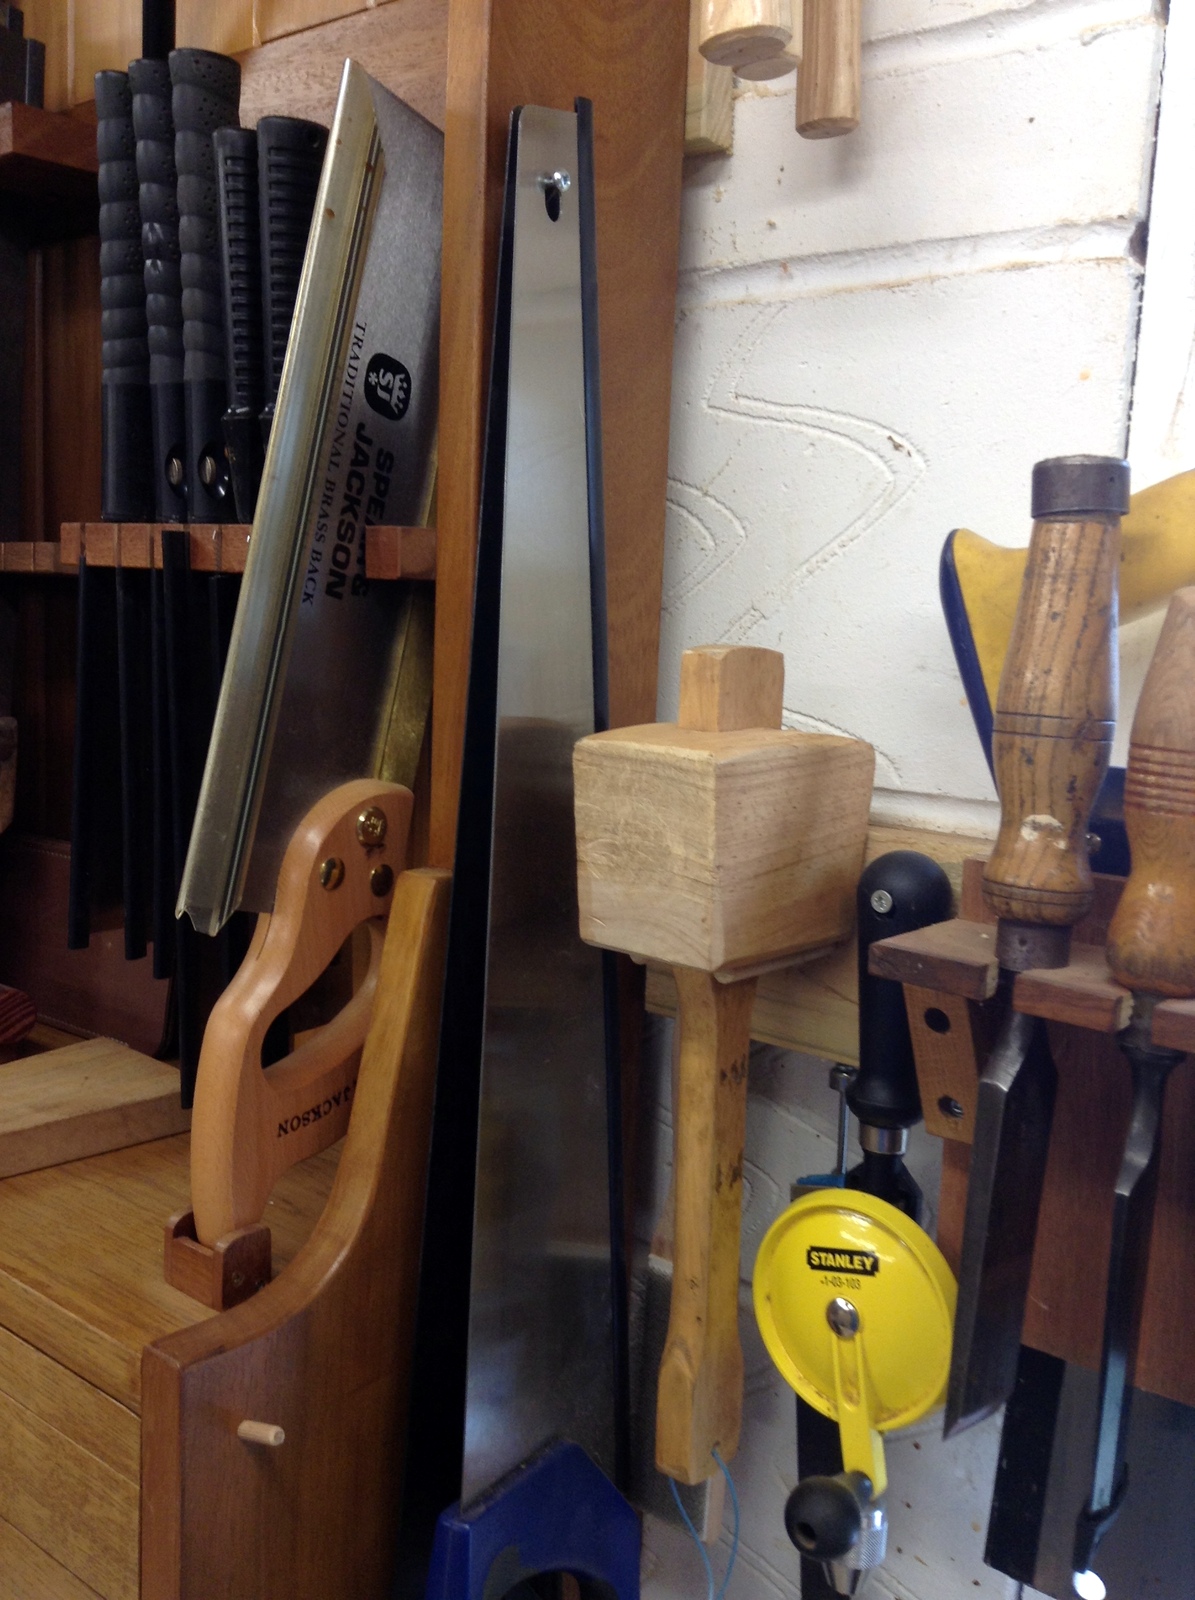
First of all I found a length of hardwood on my shelves around 1.2m (48") long. I milled this square to about 20mm (approx 3/4"). It is not essential that this is dead straight over its length and a slight about of bow is acceptable. If you can make it straight and it maintains then all the better.
Cut both ends square.
Relieve the arris on each side of the stock to remove any sharp edges and splinters.

Head fabrication

Next the head was made from a length of walnut cut to 20 x 30 x 90 mm (3/4" x 1-1/4" x 3-1/2").
I cut 2 blocks 20 x 30 x 35mm long (3/4" x 1-1/4" x 1-3/8") from walnut. Into one of these I drilled and tapped a hole for M6 (1/4" threads can be used in US). I also counterbored one end 12mm diameter x 10mm deep (1/2" x 3/8").

The walnut blocks were then glued on with a 20mm division to form a U section. I used the actual hardwood bar to space the blocks. There can be a slight amount of clearance here of about 10 thousands to allow the bar to slide easily back and forth. I further dowelled these blocks into place.

Graticule plate

Next an acrylic graticule was made from some 6mm (1/4") perspex or plexiglass I had in stock. It measures 30 x 90 x 6mm (1-1/4" x 3-1/2" x 1/4" thick) I scratched a line on the backside and highlighted it with a Sharpy to make it standout. Then I drilled 4 small holes, 1 in each corner, and countersunk them on the opposite face to the scratched line.

Then using small countersunk screws the transparent graticule plate was attached, line side down, across the blocks. All corners were then chamfered on my disc sander. I decided to radius 2 corners as a visual reminder as to which way around the reference face goes.

Assembly

Use a finger screw or machine bolt if you don't have one and insert it into the threaded hole. I found a plastic rod of suitable diameter and cut it to 8mm (5/16") long. This is the pressure washer to prevent marring the stock in use.


Then insert the stock and set it to a random length.

Calibration
The final part is calibrating the gauge. At this stage there is no scale on the gauge.

Take a random sheet from your racks and set it flat on your cutting bench. Cut one edge with your tracksaw to establish a straight edge. Then move the track over to the other edge of the board. Take your gauge and set the head to register on the straight edge, extend the stock until it touches the back edge of the track and lock the head in position.
Move the gauge to the other end of the track and ensure the track also is located correctly. 


Move the gauge back to the original location to ensure it hasn't moved.
 If you have track clamps lock them into place. The rubber strips on the underside of the track hold it into place 99% of the time but there is the odd time where you can knock it yourself.

Then make the cut with your tracksaw. Note that you have NOT measured anything whatsoever yet.


Remove the track saw and track.
Next using your most accurate steel rule take a measurement of the width of the board you have just cut. Make a note of this.

Applying the measuring tape.

You can buy self adhesive metal measuring tape that is intended just for this purpose. I bought one which came on a roll starting at 0mm and ending at 1000mm (0-39" approx). The ends of the tape have a large un-etched section intended for trimming to any size you wish. I bought one that works from right to left. You can also buy them that start from left and increase as you get to the right as shown below.


The tape is thin enough to slide underneath the graticule plate and between the face of the stock. Slide it into place and set it so the measurement you took is under the scratch line. Then using a few strips of blue tape temporarily stick the tape into place so it can't move. Remove the head.

Next cut the tape with tin shears to be shy of the end face. Now remove a small portion of the backing release paper and start sticking the tape down to the stock. Pull out the backing paper at 90 degrees to the tape whilst smoothing the tape as you go along. When you reach the first bit of blue tape remove it before carrying on. Do this until the entire tape is stuck down.

Using the tin shears again cut off the end that it surplus.

You will then have a gauge that starts at 127mm (5") or whatever the width of your track is.

Gauge head with measuring tape applied

My completed full length gauge


Reassemble the head into place and make a test cut this time setting the gauge to a determined length.

Measure the resultant board width and you will find it is spot on. If it isn't you can slot the holes in the graticule plate and move the scratch line slightly.

Improvements

You can put a brass threaded bush in the hole if you like but I haven't found it necessary


Thursday 27 April 2017

The French Cleat

A French cleat is basically a length of timber cut with a 45 degree bevel on its top edge. This cleat is screwed to a wall using whatever means you have at your disposal. Then you secure a corresponding cleat that is upside down with the bevel facing the item you wish to hang.
Then the cleat on your item simple is mated to the cleat on the wall and you have a strong connection to the wall. If you wish to move the item along the cleat simply lift and slide to position and let it mate back on place again.

Sketch Showing A French Cleat

Sunday 23 April 2017

Steam Bending... on a huge scale

These guys in Australia have a Defiance bending machine dating back to the 1890s and is capable of bending up to 6 inches thick x 12 inches wide boards of timber - yes that is 24/4 lumber US! A rare machine to see in action, anywhere in the world.

They are Sovereign Hill in Ballarat, Victoria. It makes my Windsor chair steam bending and acoustic guitar sides steam bending look like small beer.


Friday 21 April 2017

Saw Till Part 5

Less frequently used tools like the 3 saw files are stored behind the pull saws. There is enough room above to extract the files vertically.

Saw files simply in holes in the pull saw holder
Completion approaches with the construction of 6 drawers. There are 2 deep drawers, 2 mid sized drawers and 2 tray sized drawers. All are constructed from oak with dovetailed joints. The front panel is 19mm (3/4") thick and the drawer sides are 12mm (1/2") thick.
I used half blind dovetails in the front panel and conventional through dovetails on the other joints.

Chopping dovetails (my favourite activity in the shop) with cool jazz in the background
A finished tail board

A few unfinished drawers in situ


The bottom panels are made from 3mm (1/8") baltic birch plywood. I have a supplier (Daisymoon Designs Ltd) of this excellent material. It comes in a pack of 10 with laser cut dimensions of 300mm x 600mm (1' x 2') and is intended for model making. The only thing is you do need to keep a weight on the opened pack as it will take up moisture from the shop atmosphere after opening the shrink wrapped seal. It can cup or potato chip but soon stabilises.

After the drawers were glued up and sanded flush they were finished with a few coats of General Finishes Exterior 450. Also all of the support components were coated with finish.

A set of brass knobs were fitted to the drawers and they were fitted into place. I opted to use shop made wooden slideways. These mate with the slots in the drawer sides.

Wooden drawer runners. These are quartersawn white oak scraps.

Corresponding grooves in the side of each of the thinnest and medium drawers
I also had a few more tools to fit onto the outside of the till so I fabricated a few brackets.
This simple bracket made from a scrap and two long dowels holds...
a few tools, large deadblow, fretsaw, rafter square and my framesaw.
A Warrington pattern hammer holder.
You can never have enough hammers.
A stainless steel screw ensures that hardpoint panel saws are also to hand.
An essential place for a beverage holder is formed by the right hand tray
A cup holder

Finished saw till
The till was then filled with a few tools and it was complete.


  • Carcase timber: Iroko
  • Back panel: Western red cedar
  • Drawers and intermediate top: French oak
  • Tool carriers: Mahogany
  • Finish: Sansin SDF
  • Drawer pulls: Armac Martin Polished Brass Furniture Sash Knob 2124P/B


I hope this inspires you to get your shop organised and make sure there is a place for everything and everything in its place. Thanks for looking.