Friday 26 January 2018

Drill Press Upgrade - Part 3 the Storage Unit mobile base

The next part of the project is the mobile base onto which the storage unit is mounted. The mobile base itself is designed to nest around the drill press mobile base. There is also a notch in its top plate to allow the unit to fit around the column of the drill press.

My design of wheel axle is slightly different than the WoodSmith plans consequently making the storage unit slightly wider. That in itself is not a problem but an opportunity for increased storage space! My shop can cope admirably with a storage unit a couple of inches wider than the plans.
View from rear of drill press showing nesting of  both mobile bases


I measured the resultant drill press mobile base width and changed my Sketchup drawings accordingly.

Exploded view of the storage unit mobile base


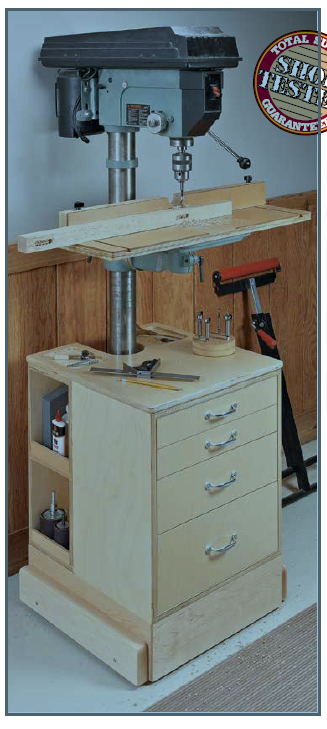
Again construction of this is utilising birch plywood and construction lumber. The sides and front of the base are rabbeted and are glued/screwed to the top. I decided to use pocket hole construction to augment the glue and rabbets.

The wheel blocking again was made from construction lumber but this time a cover plate was added. This covers the wheels but allow a full axle pin to be inserted from the outside and through into the side plate. This has a pair of washers, one either side of the wheel faces to provide a bearing face. Sufficient clearance is given by carefully measuring the washer and wheel assembly combined thickness and planing the blocking to that thickness + a few thousandths of an inch.

The axle holes were drilled with an drill guide of the correct diameter. This ensured that the holes were exactly drilled at rigt angles to the face of the boards. The holes were drilled blind into the plywood to about 13mm (1/2") deep. Then this hole had a 4mm through hole drilled into it. This ensures that the axle pin does not push through but still can be extracted, with a small diameter pin punch, for maintenance.

Then the top plate is notched out to suit the column of the drill press.

The fabrication was then rounded over with a router round over bit where necessary. Then it was finished with General Finishes Exterior 450.

The axle pin is held in place with a grub screw bearing onto a filed flat on the axle.


Again the resultant mobile base is strong, stable and the ideal platform for the carcase.


Monday 22 January 2018

Drill Press Upgrade - Part 2 the drill press mobile base

This is a very simple platform constructed from birch plywood and some softwood I had lying on the shop shelves.
The distance between the side panels is made to suit your particular drill press base.

The side panels are glued and conventionally screwed to the plywood base. It is important to also use screws when gluing anything that is taking weight to plywood. The plywood face veneers are only held on with glue and are thin. So the glue between the plywood layers itself probably won't fail but the thin wood veneer may shear away.

The axles I used were simply M8 (3/8") coachbolts. Their square ends are on the inner faces of the side boards.
There is also a large penny washer and nut holding the bolt securely. The washer and nut are set into a counter bored hole on the outside of the side boards.
There is a further washer, the wheel itself, another washer and a Nyloc locking nut holding each wheel onto the axle. When adjusting the Nyloc nut it is easy to give sufficient end float clearance to allow the wheels to freely rotate without slop.


The next part is the wheel blocking which also carries the jacking screws. This again is made from softwood. I put metal screw inserts into the underside to carry the jacking screws. The blocking is cut to suit the radius of the wheels and each one is glued and screwed to the mobile base fabrication.

The jack screws themselves have knobs fixed to them to allow you to jack easily from above. I fixed the knobs to the screws with locknuts. The blocking needs clearance to allow the knobs to screw down and operate. This picture shows my solution.

Then all edges are rounded off with a router roundover bit. This last part is not essential but makes for a neat appearance. The whole fabrication is sanded and finished with General Finishes Exterior 450.

I disassembled the drill press and placed the base onto the mobile base. I then drilled for metal screw inserts and used suitable bolts/washers to secure it to the mobile base. 
At the time of taking this photograph I didn't have the knobs fitted to the jacking screws

The result is a very firm linear mobile base with a low centre of gravity.


Monday 15 January 2018

Drill Press Upgrade - Part 1 Design Process

For years I have persevered with my floor mounted drill press. I had fastened this to the concrete floor in the shop with anchor bolts but the position of it wasn't ideal. Obviously a home workshop is in a constant state of flux and is constantly evolving so my initial thoughts on where it should be sited have now changed. When you find a need for a change to your particular workflow if there is something bolted down it can limit your plans.
This project is intended to give me more flexibility in the location of the drill press in my shop.
Also I want to have extra drawer storage space so I designed this into the project.

The main criteria was:

  • Ability to move the drill press
  • A stabilized base
  • Storage space local to the drill press


So I looked around for potential plans and found one from Woodsmith.
It seemed to fill all my requirements so I adapted the plans to suit my particular drill press.


The thing I liked about the plans were the mobile base with a low centre of gravity and a nesting storage unit. This is also on wheels and can be pulled out so allowing the drill press full height to be used if necessary. I don't have a requirement to wheel the press all around the shop as if on a shopping cart with rotating castors so the fixed axis wheels are fine for my needs.
Also I conventional metal mobile base would not suit my particular requirements so was discounted completely.

So here is my Sketchup representation of the entire mobile base/storage unit shown as exploded and nested.

This shows the storage unit nesting around the mobile base.
I used a 3D model of a Delta drill Press that I found on the
Skecthup 3D Warehouse. It was close enough dimensionally to my
drillpress.

This shows how the storage unit can be pulled out on
its integral wheels (hidden by the side plate)
should the need to use the full capacity of the drill press be required.
The drill press mobile base also has screw jacks to further stabilise the
whole of the floor stand.

This is an exploded view of the storage unit.
4 drawers and 4 storage cubbies give further storage space
to a crowded small shop.

I decided to make the entire unit from birch plywood and some construction timber. The edges of the drawer fronts and storage unit top were to be edge banded with hardwood.

Full extension 10" (250mm) stainless steel slideways for the drawers, 8 x 3" diameter no mar wheels and 4 jacking screws with non slip pads make up the hardware for the entire project.

Also as much as possible glued and pocket screws construction is used. Pocket screws can be immensely strong, especially for shop furniture, and I believe get a bad press. I have made loads of sheet good based projects with pockets screws and find them very strong.  Maybe the advent of the Festool Domino has created this perception, I don't want to start a debate on this (you are free to start another thread if you desire) but I don't currently have one so pocket screws it is.

Wednesday 10 January 2018

2018 has arrived and no woodworking - yet

It is a cold January 2018 day today. The car was frozen up and I opened the shop for the first time since before Christmas and put the heating on. Nothing had rusted so the application of CRC 3-36 periodically throughout the year had worked its benefits.

CRC 3-36 Corrosion Protection

I have a few jobs lined up to do this year at least until spring. My nephew and niece-in-law are having a new baby in a couple of weeks and a request has been made to build a toy chest similar to one I made a few years back. I have a stock of oak and need to buy some birch plywood and some special hinges. The hinges prevent tiny fingers being trapped as they stop the lid from falling too quickly.

Toy Chest made in January 2015


I also have a request from a customer to build a metronome. The customer will supply the mechanism and gave me some wood, I believe it is utile, in barter for making the case.

Further purchases planned for the year are a new bandsaw (probably an 18" for resaws) and a Domino DF500. I have to get these in this year as Brexit may bring price hikes.

Festool Domino DF500
There is also a 5 string fretless bass that I am part way through to finish off.

Drilling the hole for the bridge earthing/grounding strap

Applying CA glue to the fretboard. Mahogany markers have been inlayed
as fret positions.

There are a few other jobs that I also have to start.